You can format a USB flash drive to wipe out its content and fix problems quickly, and in this guide, we'll show you seven ways to complete this task on Windows 10.
On Windows 10, the ability to format a USB flash drive can be helpful in many scenarios. For instance, sometimes, you may need to reformat a removable storage device to make sure it does not contain any malicious code or when the thumb drive is not accessible because of data corruption. You received a flash drive using a file system that happens to be incompatible with your system configuration. Or you plan to get rid of the storage device and want to make sure you are not leaving behind any personal information.
Regardless of the reason, Windows 10 includes several tools to format all kinds of storage (such as USB flash drives) using File Explorer, Disk Management, Command Prompt, and PowerShell.
In this Windows 10 guide, we will walk you through the different ways you can format a USB flash drive to quickly erase its contents or fix problems when the device isn't recognized.
Warning: The instructions outlined in this guide will erase everything on the selected drive. If you have any important files, you should back them up before proceeding.
How to format USB flash drive with File Explorer
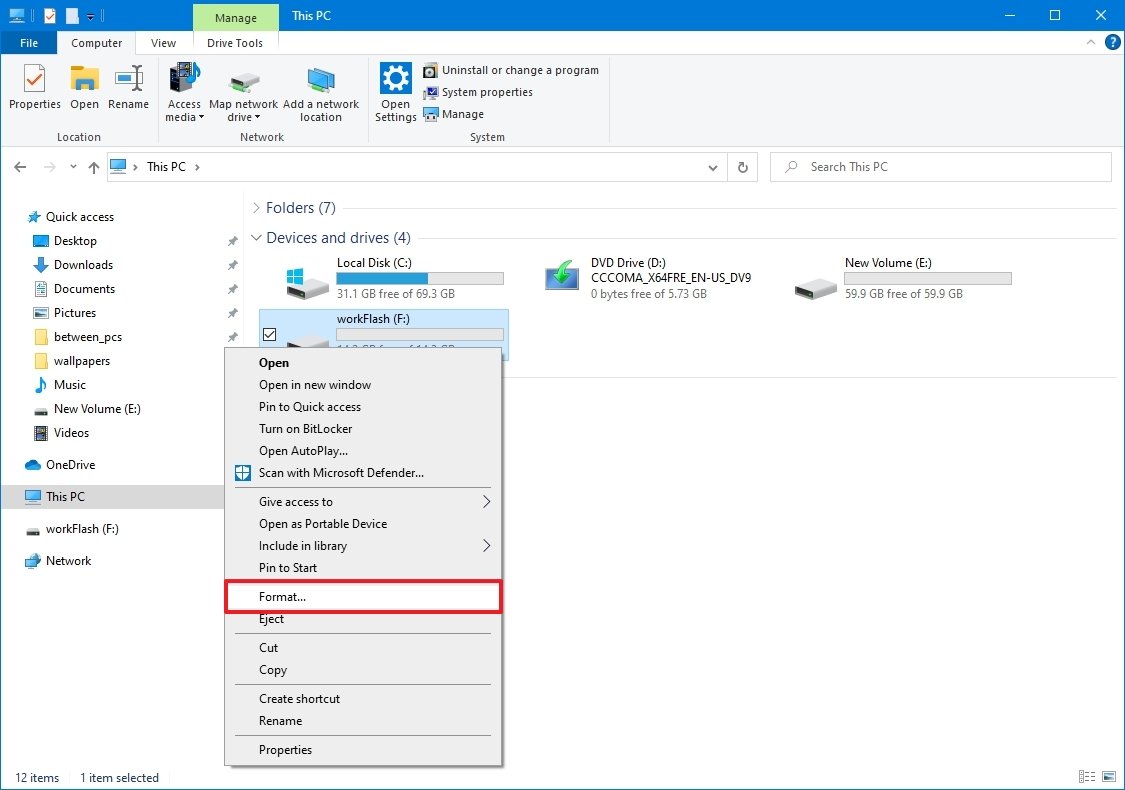
To format a USB flash drive using File Explorer on Windows 10, use these steps:
- Open File Explorer.
- Click on This PC from the left pane.
-
Under the "Devices and drives" section, right-click the flash drive and select the Format option.
-
Use the "File system" drop-down menu and select the NTFS option.
Quick tip: If you plan to use the removable storage on Windows 10 as well as on macOS systems, you may want to select the exFAT option for compatibility. However, if you think about using the device on a Linux machine, FAT32 is the best option, even though you will be limited to 4GB file sizes.
- In the "Allocation unit size" drop-down menu, use the default selection.
- In the "Volume label" field, confirm a drive name that will appear in File Explorer. For example, workFlash.
-
Under the "Format options" section, select the Quick format option.
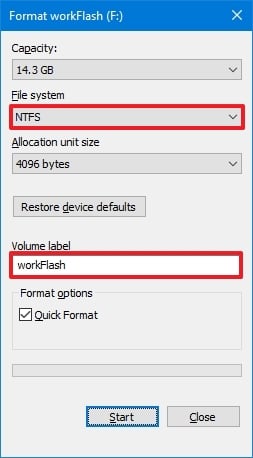
Quick note: The "Quick format" option only deletes the file system table and the root folder, but the data may still be recoverable. If you do not check the option, a full format operation will be performed, and it will do a scan for bad sectors and writes zeros in all sectors deleting the data. As a result, this process can take a long time, depending on the size of the drive.
- Click the Start button.
- Click the Yes button.
Once you complete the steps, the flash drive will be ready to store documents, pictures, videos, and other files on the removable drive.
How to format USB flash drive with Disk Management
The Disk Management tool offers at least two routes to format a USB flash drive. You can format the storage to rebuild the file system table and erase the content, or you can delete the partition that comes in handy to fix storage problems.
Format flash drive
To use Disk Management to format a USB drive, use these steps:
- Open Start.
- Search for Create and format hard disk partitions and click the top result to open the Disk Management tool.
-
Right-click the removable drive and select the Format option.

- In the "Volume label" field, confirm a name to identify the storage in File Explorer.
- Use the "File system" drop-down menu and select the NTFS option. (You can also select the "FAT32" or "exFAT" option.)
- In the "Allocation unit size" drop-down menu, use the Default option.
-
Check the Perform a quick format option.
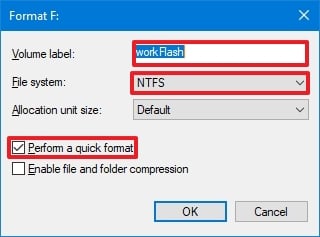
- (Optional) Check the Enable file and folder compression option.
- Click the OK button.
After you complete the steps, the drive will be erased and reformatted to store data again.
Clean and format flash drive
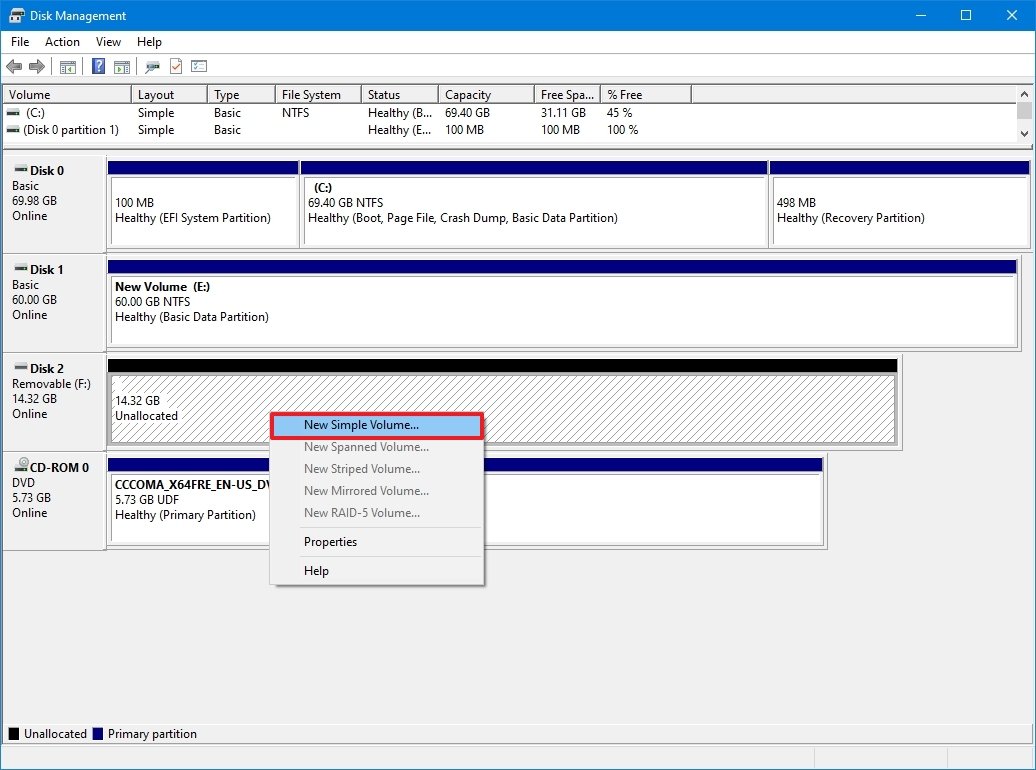
If you are dealing with errors or other problems, you can clean the USB drive and start again from scratch with a new partition and file system with Disk Management.
To clean and format a USB flash drive, use these steps:
- Open Start.
- Search for Create and format hard disk partitions and click the top result to open the Disk Management tool.
-
Right-click the removable storage and select the Delete volume option.

- Click the Yes button.
-
Right-click the "Unallocated" space and choose the New Simple Volume option.
- Click the Next button.
- Click the Next button again to use all the available space.
- Select the Assign the following drive letter option.
-
Use the drop-down menu to select one of the available letters.
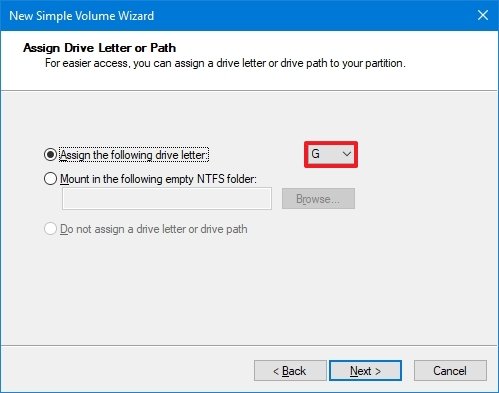
Quick tip: If you assign a letter manually, it is best to select a letter in reverse order (Z, Y, X, and so on).
- Click the Next button.
- Select the Format this volume with the following settings option.
-
Use the File system drop-down menu and select the NTFS option.
Quick note: Using this method, you can only use "NTFS" or "FAT32." If you need to format the drive using "exFAT," you will need to use Command Prompt or PowerShell
- In the "Allocation unit size" drop-down menu, use the Default option.
- In the "Volume label" field, type a label to identify the flash drive in File Explorer quickly.
-
Check the Perform a quick format option. (If you clear the option, a full format will take place that can take some time depending on the storage size.)
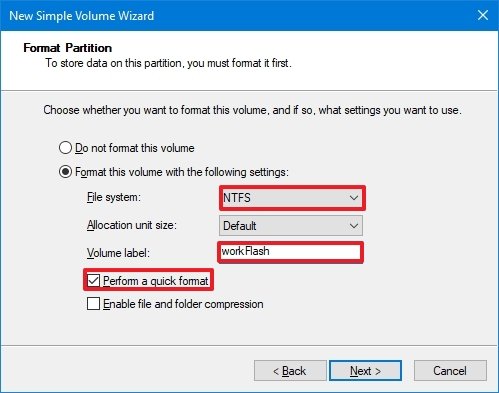
- (Optional) Check the Enable file and folder compression option.
- Click the Next button.
- Click the Finish button.
Once you complete the steps, the process will create a new partition and set up the file system, fixing common problems with the flash drive, including data corruption.
If you cannot perform a format, the removable drive is probably broken. If this is the case, you can always purchase another USB flash drive, such as the SanDisk Ultra Fit USB 3.1 flash drive, which comes in 16GB up to 512GB variants with enough space to save large files and small backups. You can find even more great options in our roundup of best flash drives.
SanDisk Ultra Fit
Reliable storage
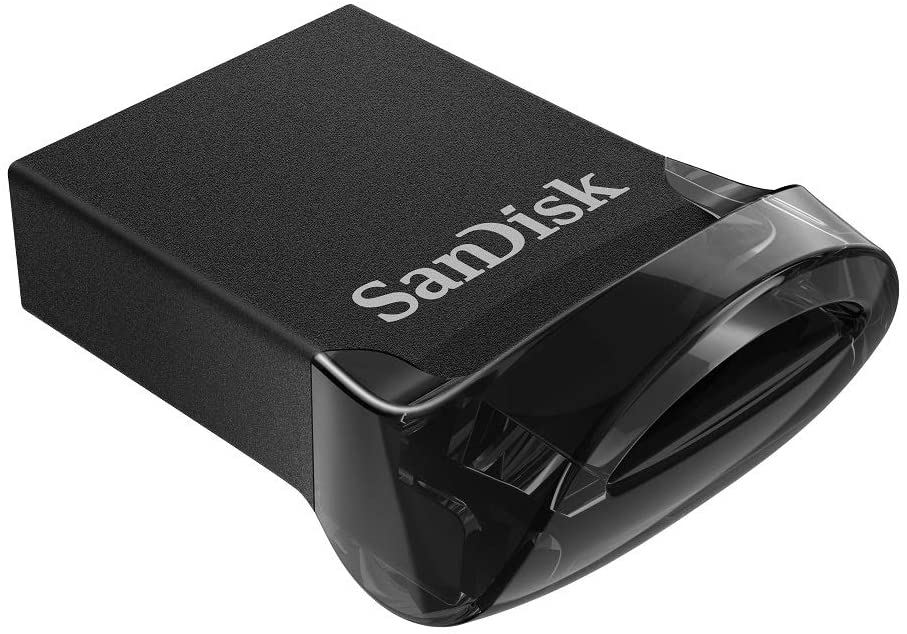
If you're in the market for a reliable thumb drive with enough storage for large projects and fast transfer speeds, the SanDisk Ultra Fit USB 3.1 flash drive is an excellent option. The removable drive offers up to 512GB of storage with transfer speeds up to 130MB/s, it's backed by a strong brand, and it even includes some nifty features like password protection, recovery, and encryption. It's also affordable, at around $6.32 for 16GB.
How to format USB flash drive with PowerShell
You can even use PowerShell commands to format a USB flash drive to erase its content. Or the command-line tool can also be used to clean and format the storage to resolve corruption and other problems.
Format flash drive using PowerShell
To format a USB flash drive using PowerShell commands, use these steps:
- Open Start.
- Search for PowerShell, right-click the top result, and select the Run as administrator option.
-
Type the following command to perform a quick format on the flash drive and press Enter:
Format-Volume -DriveLetter DRIVE-LETTER -FileSystem FILE-SYSTEM -NewFileSystemLabel DRIVE-NAMEIn the command, replace DRIVE-LETTER with the correct letter reflecting the drive you want to format, FILE-SYSTEM for FAT32, exFAT, or NTFS, and DRIVE-NAME with the name you want the device to appear in File Explorer.
This example performs a quick format of the "F" drive with the NTFS file system:
Format-Volume -DriveLetter F -FileSystem NTFS -NewFileSystemLabel workFlash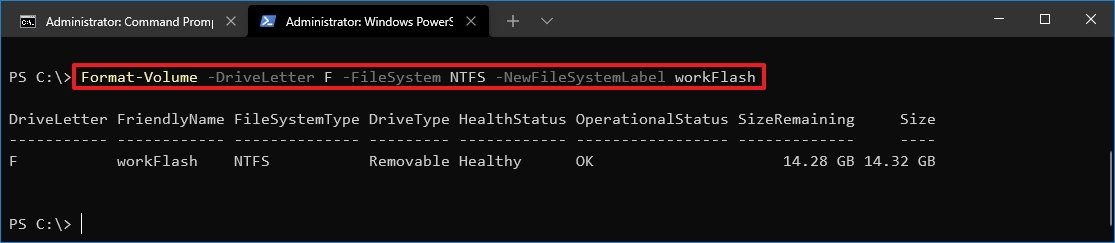
-
(Optional) Type the following command to perform a full format of the USB flash drive and press Enter:
Format-Volume -DriveLetter DRIVE-LETTER -FileSystem FILE-SYSTEM -Full -ForceIn the command, replace DRIVE-LETTER with the correct letter reflecting the drive you want to format, and FILE-SYSTEM for FAT32, exFAT, or NTFS, depending on the file system you want to use. If you do not know, and you are using Windows 10, then you could use NTFS. The
Fulloption tells the command to perform a full format, and the-Forceoption specifies the override switch.This example performs a full format of the "F" drive:
Format-Volume -DriveLetter F -FileSystem NTFS -Full -Force
After you complete the steps, PowerShell will format the removable storage with the settings you specified.
Clean and format flash drive using PowerShell
To clean and format a removable drive with PowerShell commands, use these steps:
- Open Start.
- Search for PowerShell, right-click the top result, and select the Run as administrator option.
-
Type the following command to view the flash drive you want to fix and press Enter:
Get-Disk -
Type the following command to delete the volume and press Enter:
Get-Disk DISK-NUMBER | Clear-Disk -RemoveDataIn the command, change DISK-NUMBER for the correct number representing the flash drive you are formatting.
This example selects and cleans the disk number 2:
Get-Disk 2 | Clear-Disk -RemoveData -
Type Y to confirm the action and press Enter.
-
Type the following command to create a new partition and press Enter:
New-Partition -DiskNumber DISK-NUMBER -UseMaximumSizeIn the command, change DISK-NUMBER to the correct number representing the storage you are formatting.
This example creates a new partition using the entire space available on drive number 2:
New-Partition -DiskNumber 2 -UseMaximumSize -
Type the following command to perform a quick format and assign a drive label, and press Enter:
Get-Partition -DiskNumber DISK-NUMBER | Format-Volume -FileSystem FILE-SYSTEM -NewFileSystemLabel DRIVE-NAMEIn the command, change DISK-NUMBER for the number that identifies the storage in the system, FILE-SYSTEM for "NTFS," "FAT32," or "exFAT," and DRIVE-NAME with the name you want the device to appear in File Explorer.
This example selects and formats drive number 2 using the NTFS file system:
Get-Partition -DiskNumber 2 | Format-Volume -FileSystem NTFS -NewFileSystemLabel workFlash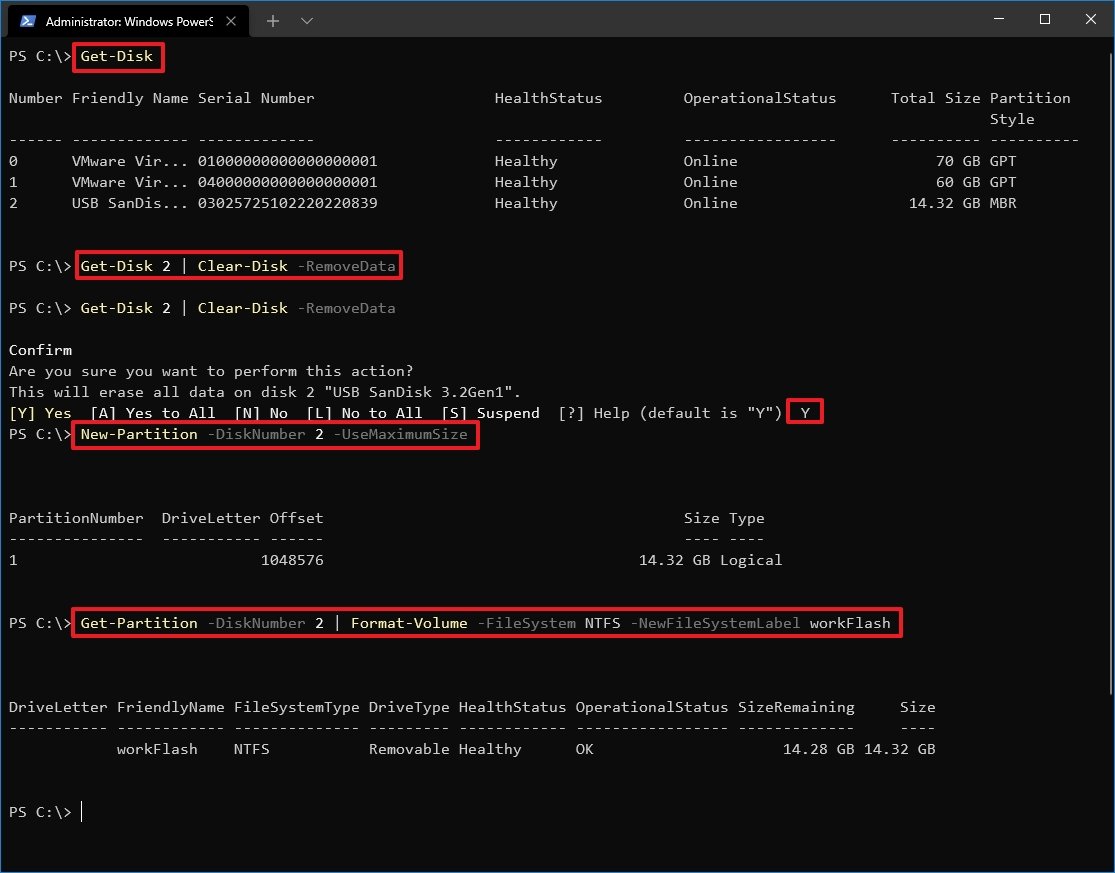
-
Type the following command to assign a new letter to the drive and press Enter:
Get-Partition -DiskNumber DISK-NUMBER | Set-Partition -NewDriveLetter DRIVE-LETTERIn the command, replace DISK-NUMBER for the number that identifies the storage in the system, and DRIVE-LETTER with the letter you want the device to appear in File Explorer.
This example sets "E" as the drive letter for disk number 2:
Get-Partition -DiskNumber 2 | Set-Partition -NewDriveLetter E
After you complete the steps, PowerShell will remove any information on the removable USB storage to fix problems, including data corruption, write protection, and unrecognized drives. Then it will proceed to create a new partition and configure a file system to store files.
How to format USB flash drive with Command Prompt
Alternatively, you can also format a USB flash drive using commands. Or you can use the Command Prompt to clean the drive and start fresh with a new partition and file system table.
Format flash drive using command-line
To perform a quick or full format on a USB flash drive with Command Prompt, use these steps:
- Open Start.
- Search for Command Prompt, right-click the top result, and select the Run as administrator option.
-
Type the following command to perform a quick format of the USB flash drive and press Enter:
format VOLUME: /v:FLASHDRIVE-LABEL /fs:FILE-SYSTEM /qIn the command, make sure to replace the VOLUME with the correct drive letter of the storage, FLASHDRIVE-LABEL with the name you want the drive to appear in File Explorer, FILE-SYSTEM with one of the available file systems, including "FAT32," "exFAT," or "NTFS."
This example performs a quick format of the E drive:
format G: /v:workFlash /fs:NTFS /q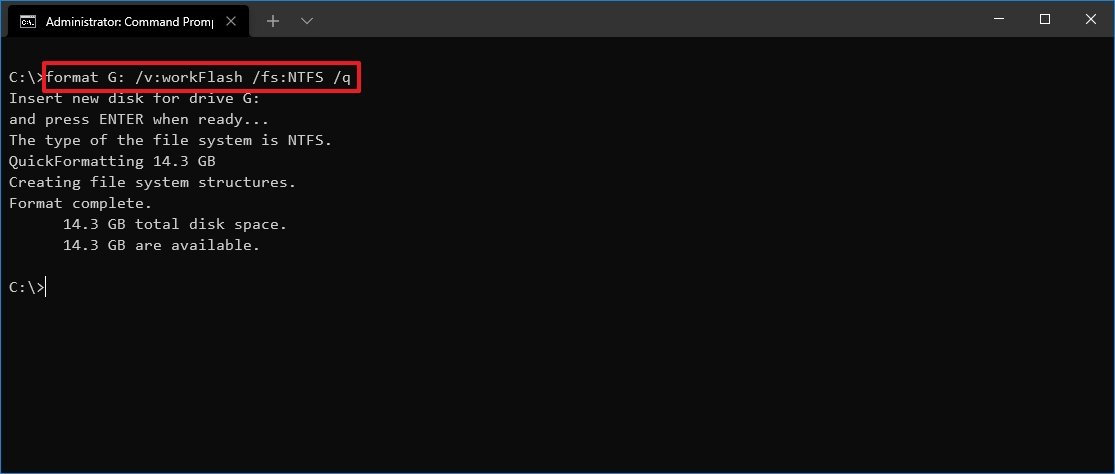
- Press Enter again to continue.
-
(Optional) Type the following command to perform a full format of the USB flash drive and press Enter:
format VOLUME: /v:FLASHDRIVE-LABEL /fs:FILE-SYSTEMThis example performs a full format of the E drive:
format E: /v:"workFlash" /fs:NTFS - Press Enter again to continue.
After you complete the steps, the thumb drive will be formatted with the settings you specified.
Clean and format flash drive using command-line
To clean and format a flash drive with command-line, use these steps:
- Open Start.
- Search for Command Prompt, right-click the top result, and select the Run as administrator option.
-
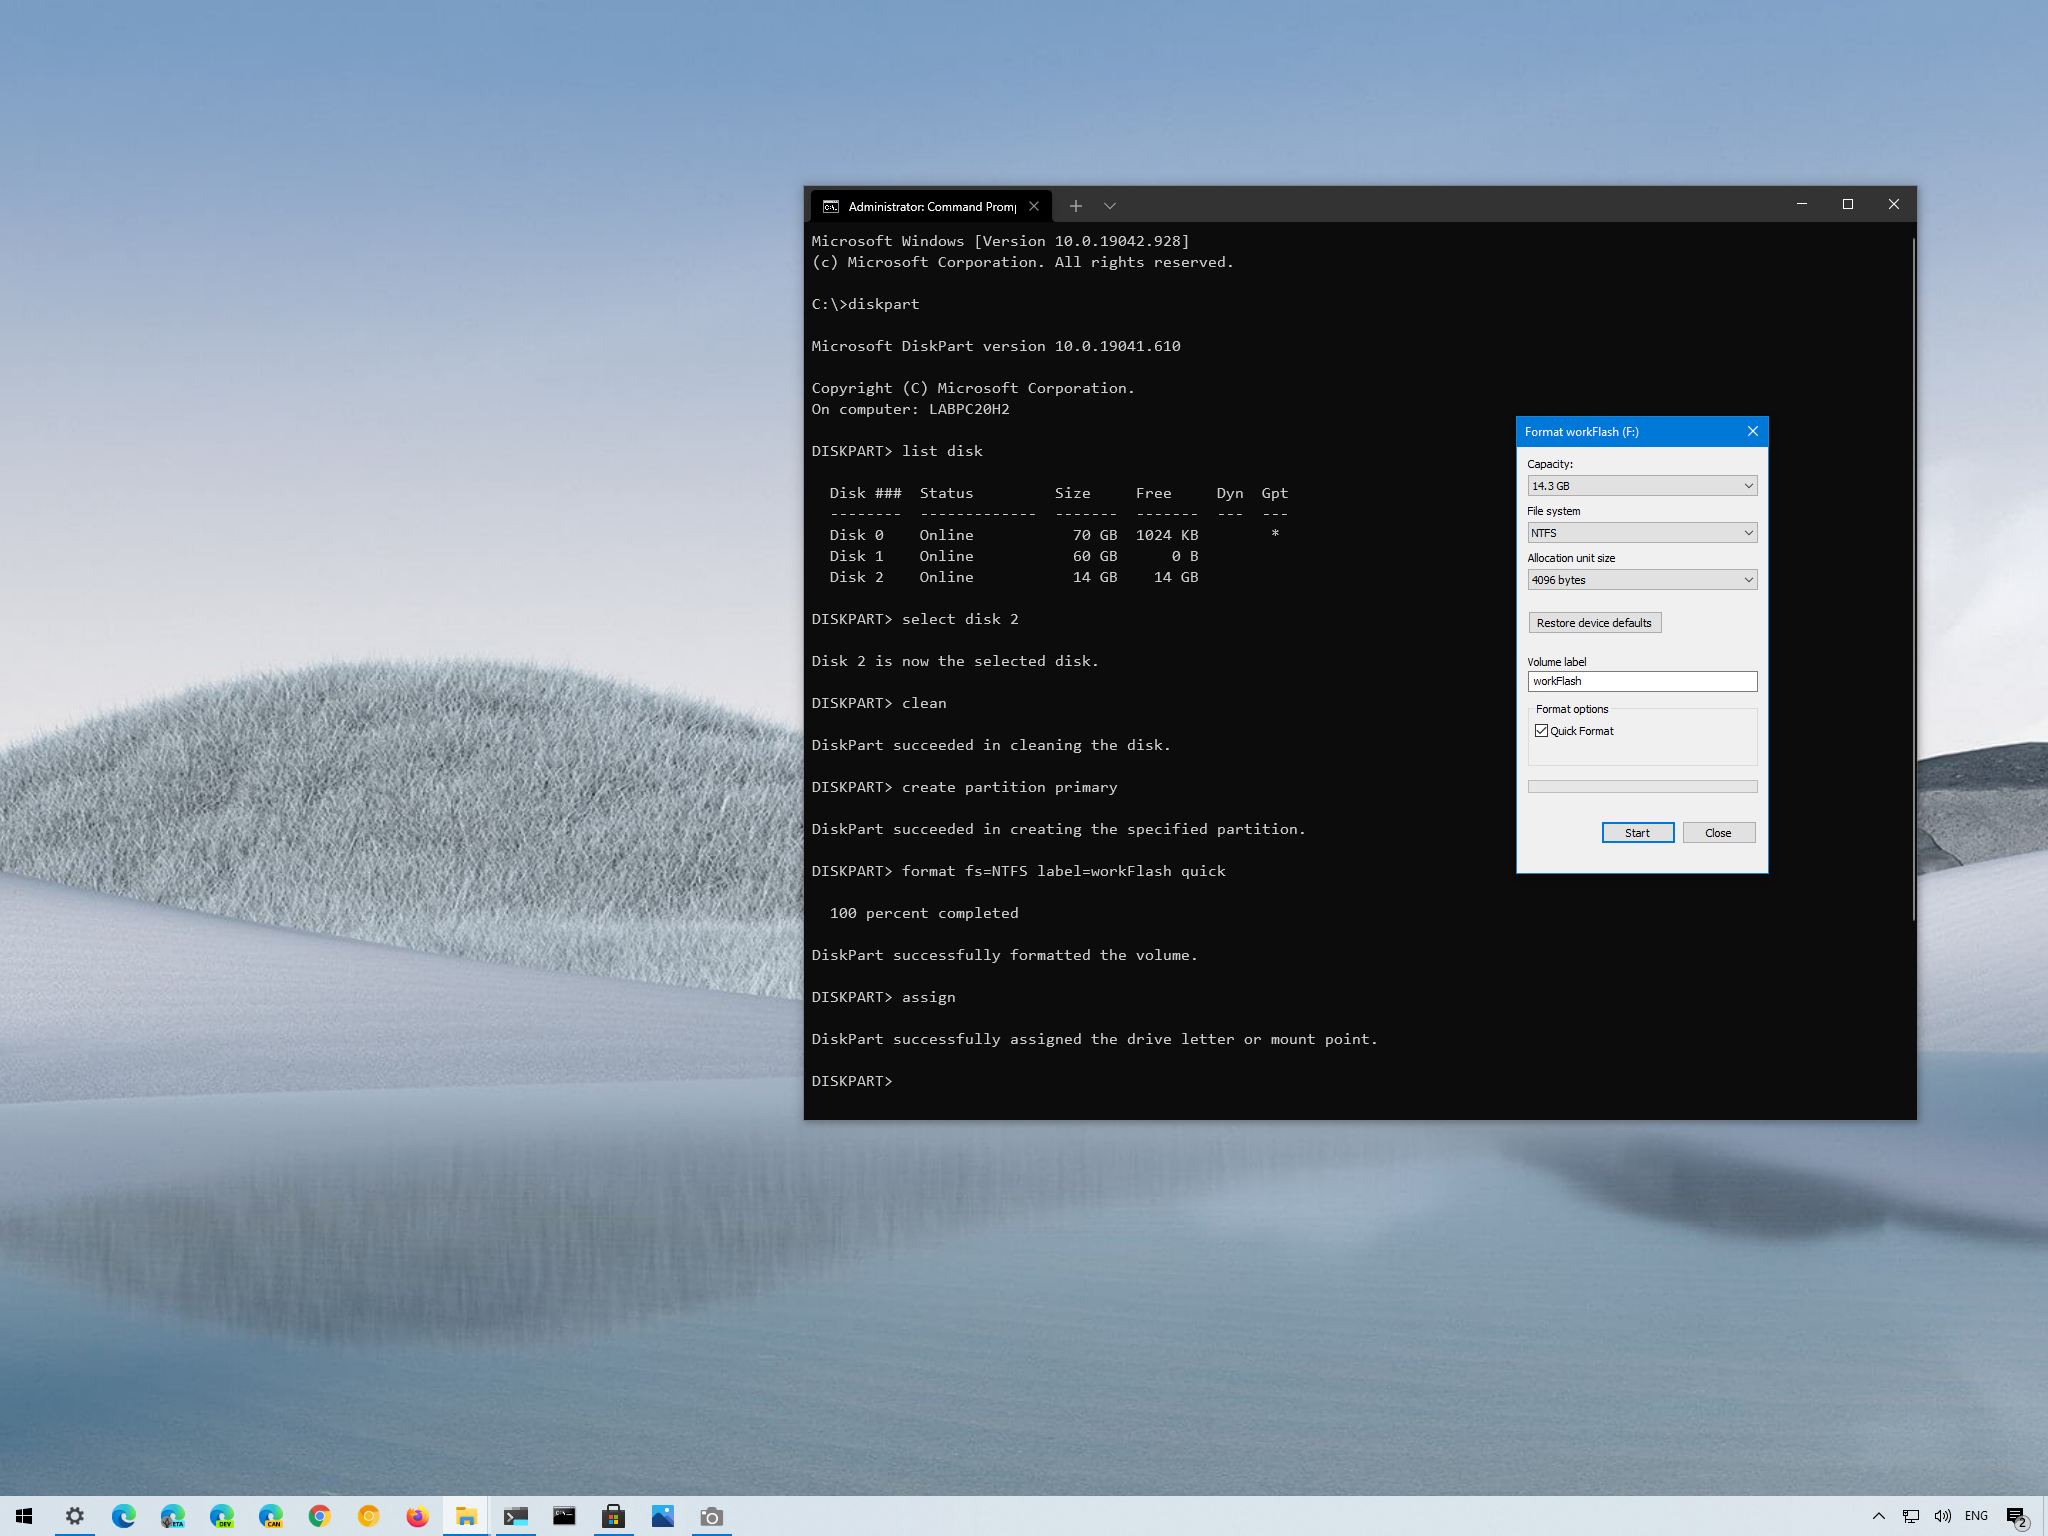
Type the following command to launch the diskpart tool and press Enter:
diskpart -
Type the following command to view a list of the available drives and press Enter:
list disk -
Type the following command to select the flash drive you want to delete and press Enter:
select disk DISK-NUMBERIn the command, make sure to replace DISK-NUMBER for the number representing the drive you are trying to format.
This example selects the flash drive listed as disk number 2:
select disk 2 -
Type the following command to delete all the partitions on the storage and press Enter:
clean -
Type the following command to create a primary partition and press Enter:
create partition primary -
Type the following command to perform a quick format and press Enter:
format fs=FILE-SYSTEM label=DRIVE-NAME quickIn the command, make sure to replace FILE-SYSTEM for your preferred file system, including "FAT32," "exFAT," or "NTFS." Also, replace DRIVE-NAME with the name you want to give the device, and if you do not specify the "quick" option, then a full format will be performed.
This example quickly formats the removable storage using the NTFS file system and applies the "workFlash" name:
format fs=NTFS label=workFlash quick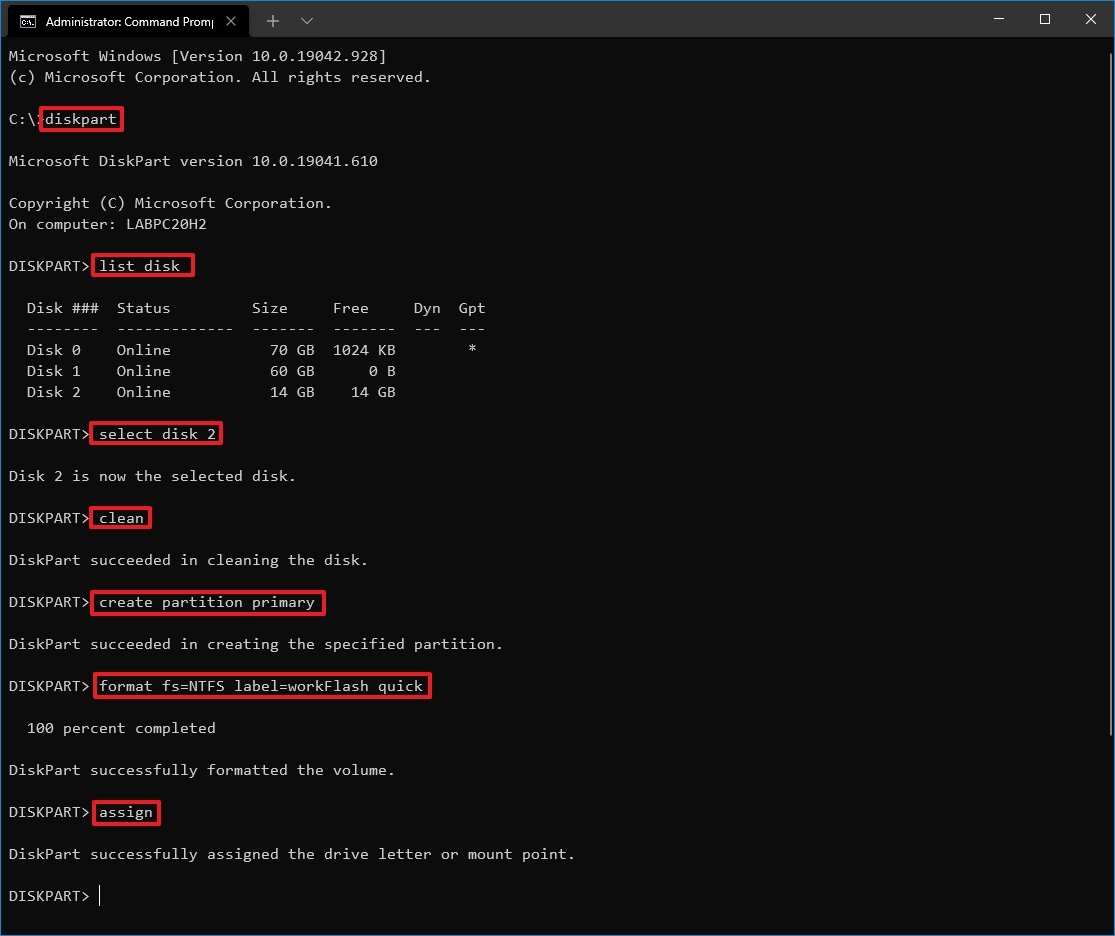
-
Type the following command to assign a drive letter and press Enter:
assignQuick note: You can append "letter=E" in the command to assign (in this case) "E" as the drive letter. Otherwise, the system will assign a letter automatically.
-
Type the following command to close diskpart and press Enter:
exit
Once you complete the steps, the diskpart command-line tool will remove any information from the USB flash drive. It will create a new partition and configure a compatible file system to store files from your Windows 10, macOS, or Linux machine (depending on your configuration).
More Windows 10 resources
For more helpful articles, coverage, and answers to common questions about Windows 10, visit the following resources:
via https://AiUpNow.com April 23, 2021 at 03:09PM by Mauro Huculak, Khareem Sudlow,
