The netsh command-line tool lets manage virtually anything about Wi-Fi connections, and in this guide, we'll show you how on Windows 10.
Although you can manage many aspects of wireless networks using the Settings app (and Control Panel), sometimes, you may still need to perform more advanced tasks. For instance, recover the wireless password for a particular profile, view detailed information about saved profiles, or create a report to troubleshoot issues, which are not common tasks available with other graphical tools.
Whatever the reason it might be, if you have to complete more advanced networking tasks, Windows 10 includes the netsh (network shell) command-line tool that you can use to view, troubleshoot, and configure virtually every network adapter on the device.
In this Windows 10 guide, we will walk you through the steps to manage wireless networks with the netsh command-line tool.
- How to view Wi-Fi network profiles stored on Windows 10
- How to view Wi-Fi network driver info on Windows 10
- How to view Wi-Fi network adapter settings on Windows 10
- How to view Wi-Fi network security key on Windows 10
- How to stop Wi-Fi network automatic connection on Windows 10
- How to delete Wi-Fi network profile on Windows 10
- How to export and import Wi-Fi network profiles on Windows 10
- How to create Wi-Fi network adapter report on Windows 10
How to view Wi-Fi network profiles stored on Windows 10
To view the wireless network profiles, use these steps:
- Open Start.
- Search for Command Prompt, right-click the top result, and select the Run as administrator option.
-
Type the following command to view the wireless network profiles saved on your PC and press Enter:
netsh wlan show profiles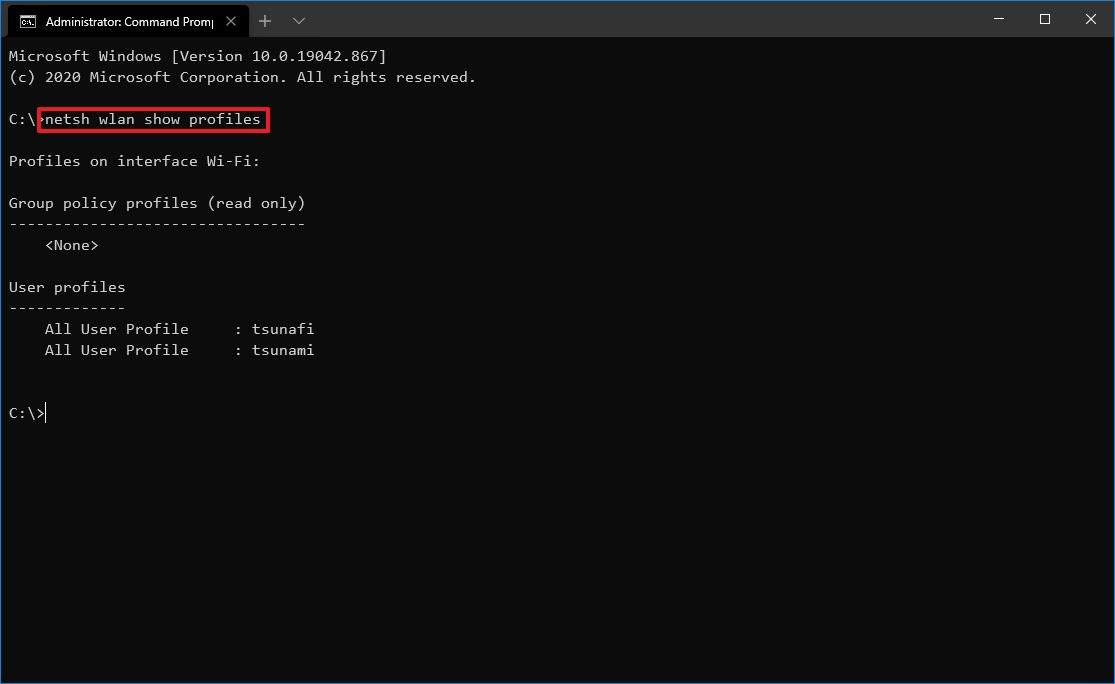
-
(Optional) Type the following command to view the saved profiles for a specific interface and press Enter:
netsh wlan show profiles interface="WLAN-INTERFACE-NAME"In the command, replace the WLAN-INTERFACE-NAME for the actual name of the interface. You can use the
netsh interface show interfacecommand to find out the exact name.For example, this command shows the profiles saved for the "Wi-Fi" interface:
netsh wlan show profiles interface="wi-fi"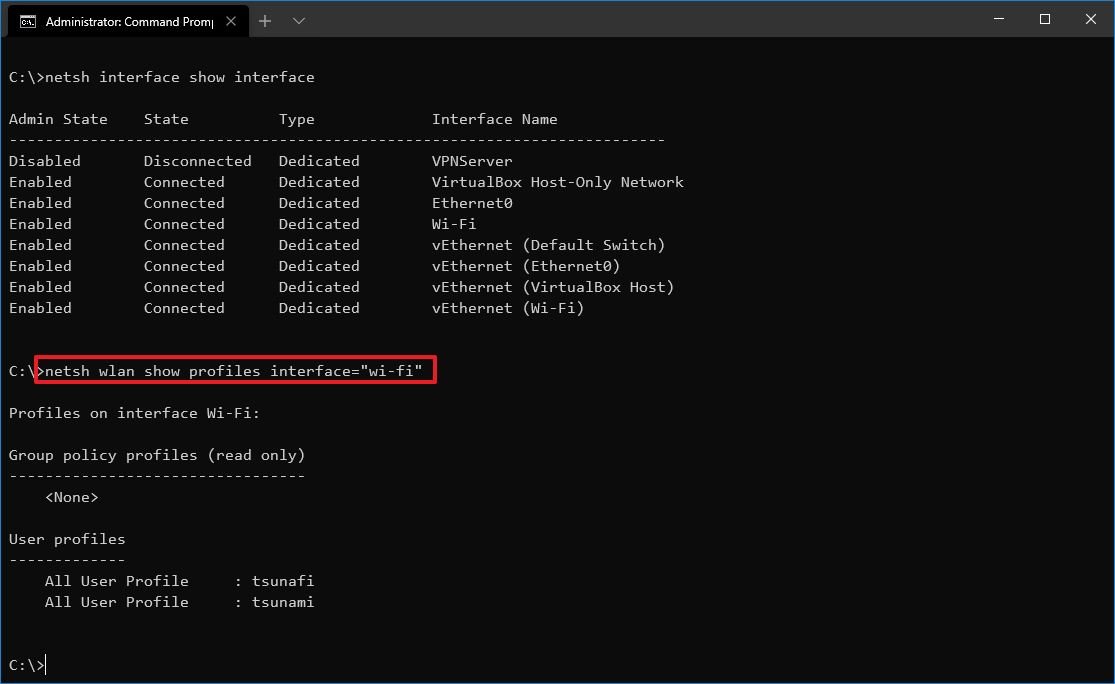
Once you complete the steps, the command will output the profiles from all the wireless networks you connected in the past on every adapter installed on the computer.
How to view Wi-Fi network driver info on Windows 10
To view the wireless adapter driver information, use these steps:
- Open Start.
- Search for Command Prompt, right-click the top result, and select the Run as administrator option.
-
Type the following command to view the wireless network profiles saved on your PC and press Enter:
netsh wlan show drivers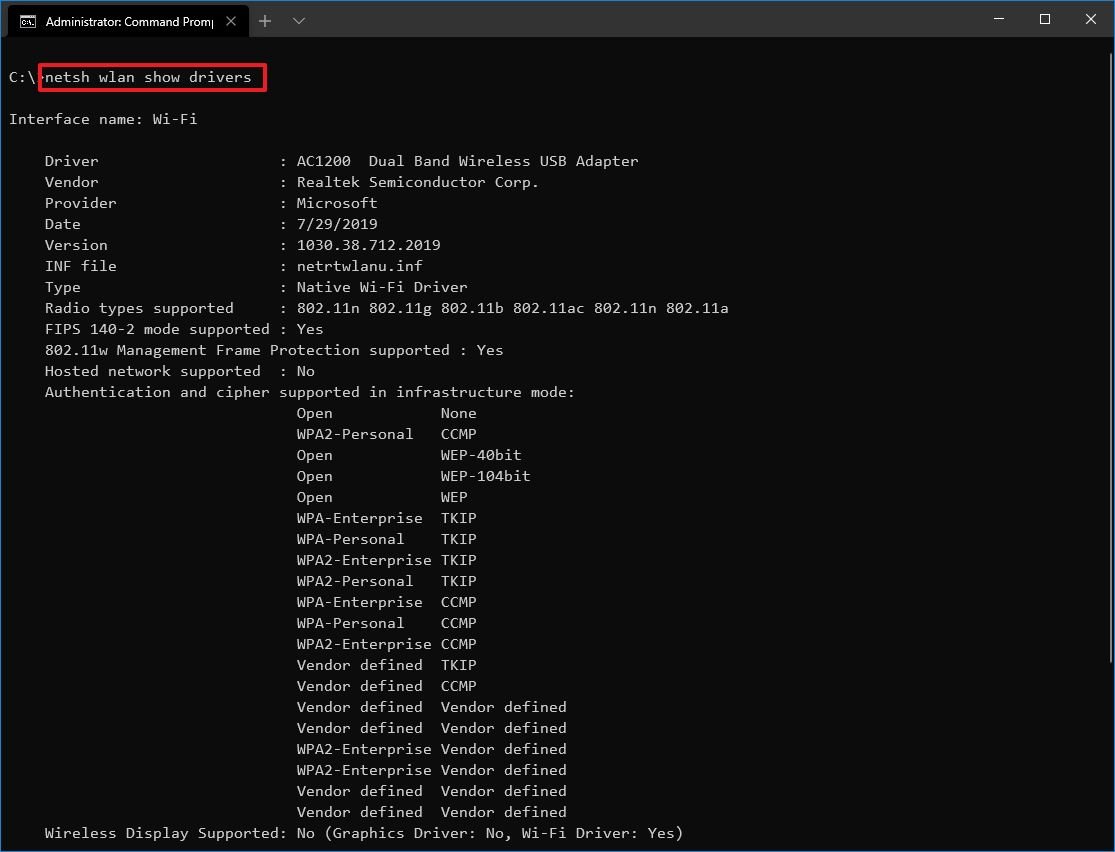
-
(Optional) Type the following command to view the adapter capabilities and press Enter:
netsh wlan show wirelesscapabilities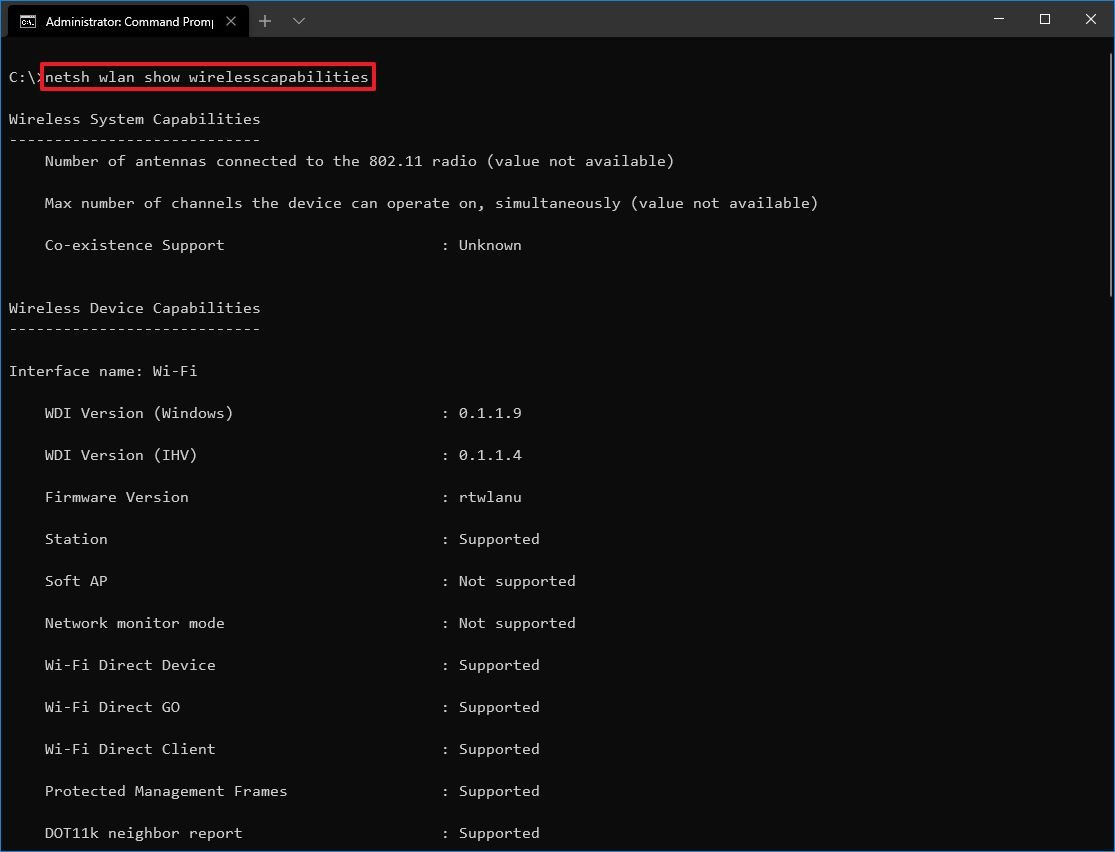
After you complete the steps, the command will provide relevant information about the driver, including vendor, version, radio type (for example, 802.11ax, 802.11a, 802.11n, etc.) and wireless authentication support, and more.
If you use the command to view the capabilities, you will see a list of all the wireless features available and those supported for the adapter.
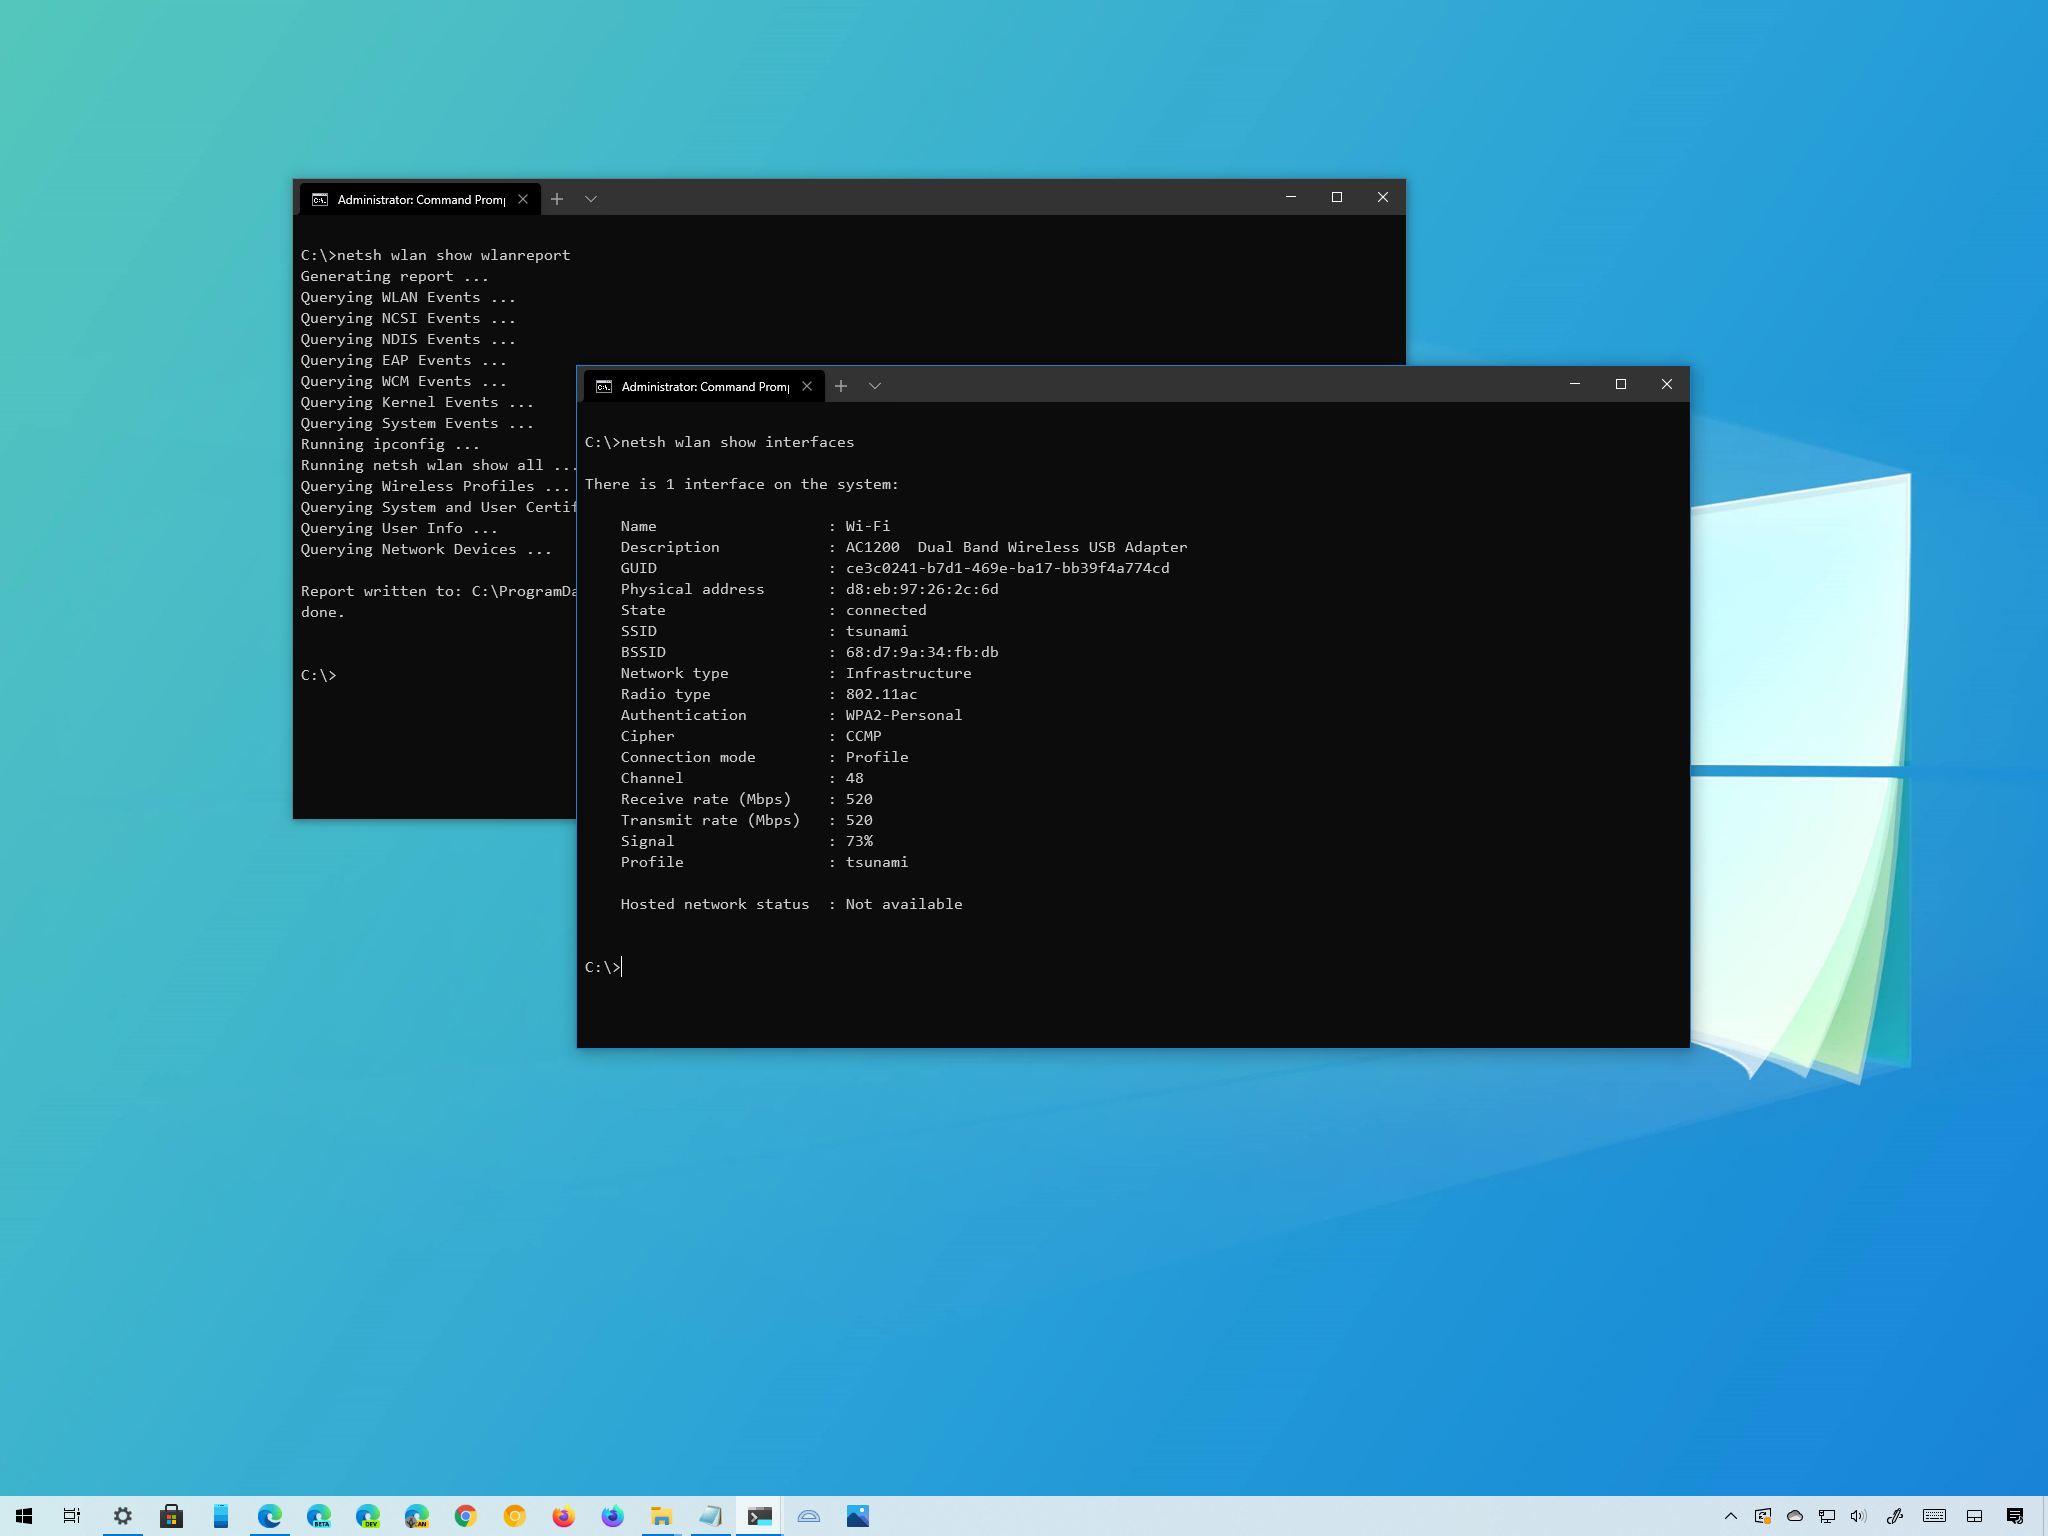
How to view Wi-Fi network adapter settings on Windows 10
To check the wireless adapter settings, use these steps:
- Open Start.
- Search for Command Prompt, right-click the top result, and select the Run as administrator option.
-
Type the following command to view wireless settings and press Enter:
netsh wlan show interfaces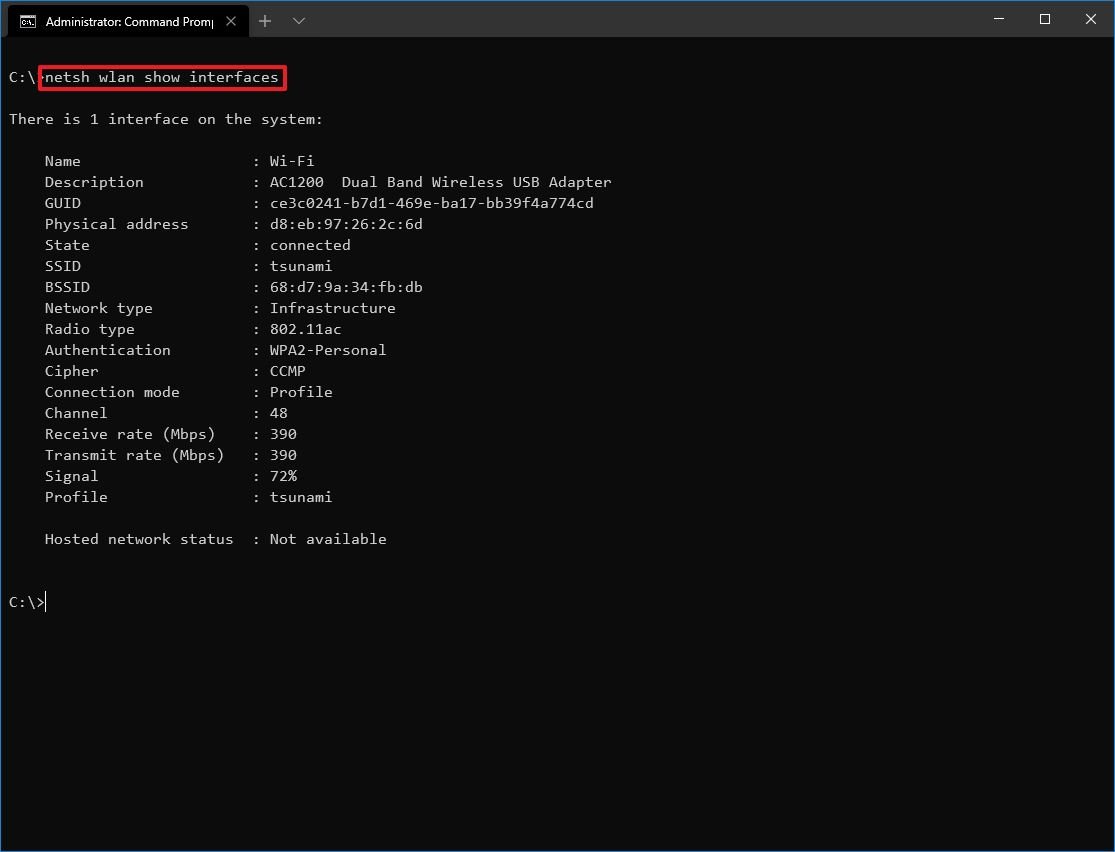
-
(Optional) Type the following command to view the settings for a specific interface and press Enter:
netsh wlan show interface name="WLAN-INTERFACE-NAME"In the command, replace the WLAN-INTERFACE-NAME for the actual name of the interface. You can use the
netsh interface show interfacecommand to find out the exact name.For example, this command shows the profiles saved for the "Wi-Fi" interface:
netsh wlan show interface name="wi-fi"
Once you complete the steps, the netsh tool will display the current wireless settings for one or all the adapters, including name, description, physical address, SSID, radio type (for example, 802.11ac), security authentication method, and the current receive and transmit rates, and signal strength.
How to view Wi-Fi network security key on Windows 10
To find out the wireless security key (also known as the Wi-Fi password), use these steps:
- Open Start.
- Search for Command Prompt, right-click the top result, and select the Run as administrator option.
-
Type the following command to view wireless password and press Enter:
netsh wlan show profile name="WLAN-PROFILE-NAME" key=clearIn the command, replace the WLAN-PROFILE-NAME with the name of the profile you want to see its security key.
For example, this command shows the password for the tsunami network:
netsh wlan show profile name="tsunami" key=clear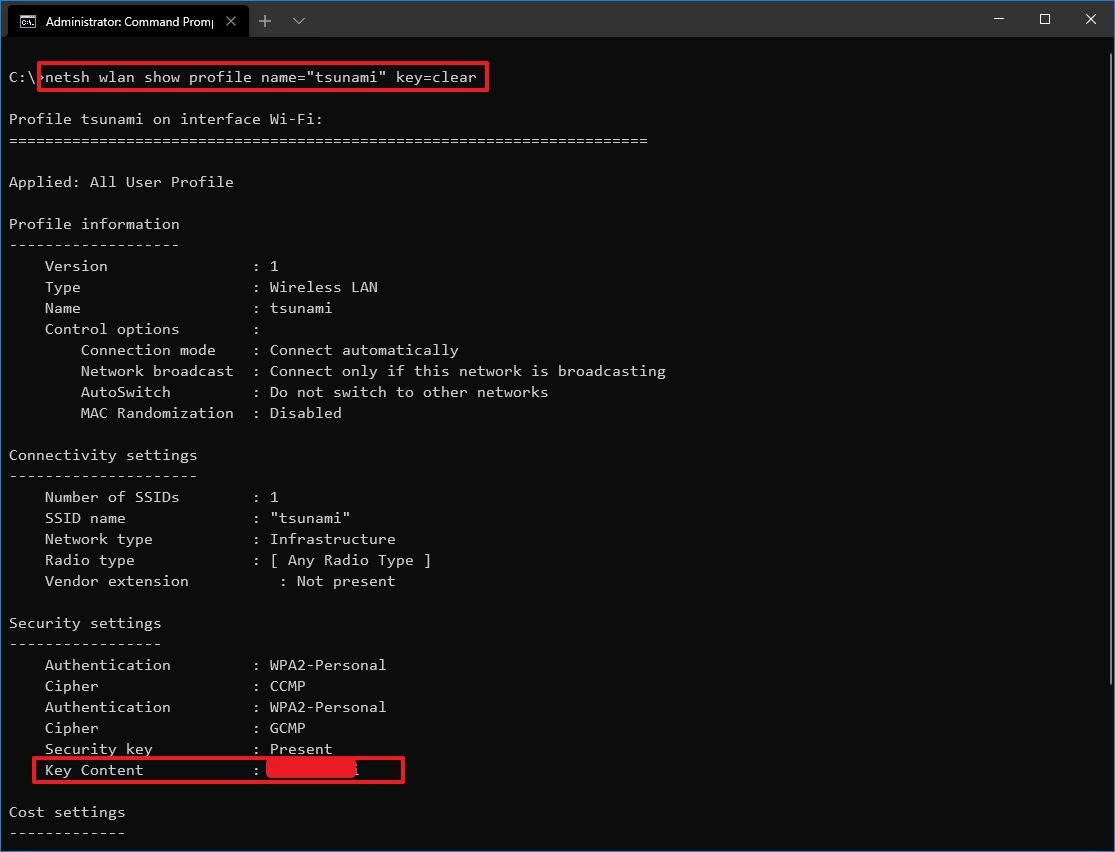
After you complete the steps, you will know the network security key for the profile you specified.
Although you can view the current network password through the wireless adapter properties in Control Panel, you can use this command to recover any network security key of any profile stored on the device.
How to stop Wi-Fi network automatic connection on Windows 10
Sometimes, you may have a device configured to connect to different wireless networks automatically, but then, you realize that it always connects to the access point even when it offers poor connectivity or the network is out of range. For those cases, you can run a command to stop connecting to known networks automatically.
To prevent a device from connecting to a Wi-Fi network automatically, use these steps:
- Open Start.
- Search for Command Prompt, right-click the top result, and select the Run as administrator option.
-
Type the following command to disable auto-connect and press Enter:
netsh wlan set profileparameter name="WLAN-PROFILE-NAME" connectionmode=manualIn the command, replace WLAN-PROFILE-NAME with the name of the wireless profile.
For example, this command disables automatic connections for the tsunami network:
netsh wlan set profileparameter name="tsunami" connectionmode=manual -
(Optional) Type the following command to change the network priority and press Enter:
netsh wlan set profileparameter name="WLAN-PROFILE-NAME" connectionmode=autoIn the command, replace WLAN-PROFILE-NAME with the wireless profile name you are trying to change its priority.
For example, this command makes the tsunami profile a priority:
netsh wlan set profileparameter name="tsunami" connectionmode=auto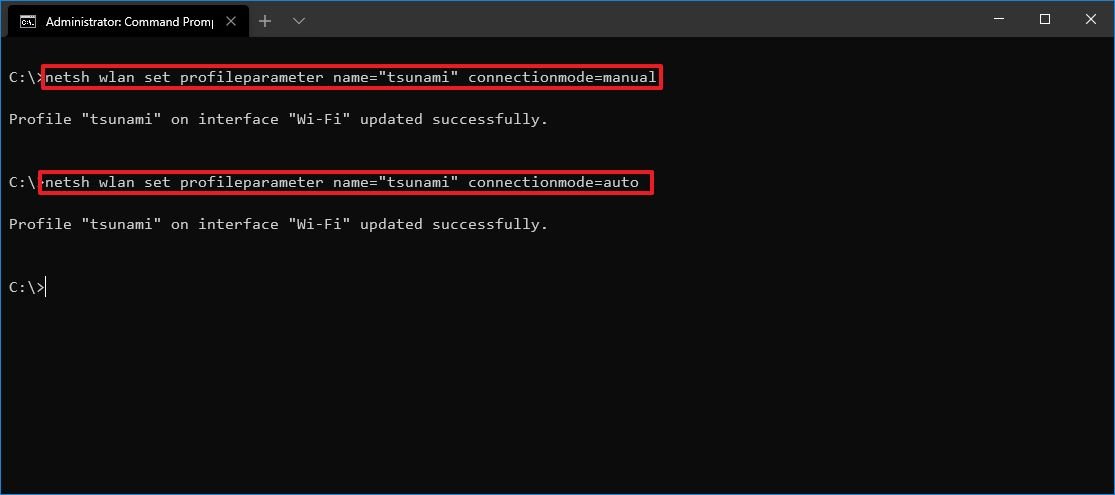
Quick note: Windows 10 will always make a priority those networks you choose to connect automatically. If you want to move up a network in the list of precedence, you can use the above command.
Once you complete the steps, Windows 10 will no longer try to connect to wireless networks automatically.
How to delete Wi-Fi network profile on Windows 10
When you no longer need to connect to a particular wireless network, the access point is no longer available, or you need to reset the network profile settings, you can use the netsh command-line tool to delete any profile stored on your computer.
To delete a Wi-Fi profile on Windows 10, use these steps:
- Open Start.
- Search for Command Prompt, right-click the top result, and select the Run as administrator option.
-
Type the following command to delete a network profile and press Enter:
netsh wlan delete profile name="WLAN-PROFILE-NAME"In the command, replace WLAN-PROFILE-NAME with the name of the wireless profile.
For example, this command deletes the tsunami profile:
netsh wlan delete profile name="tsunami"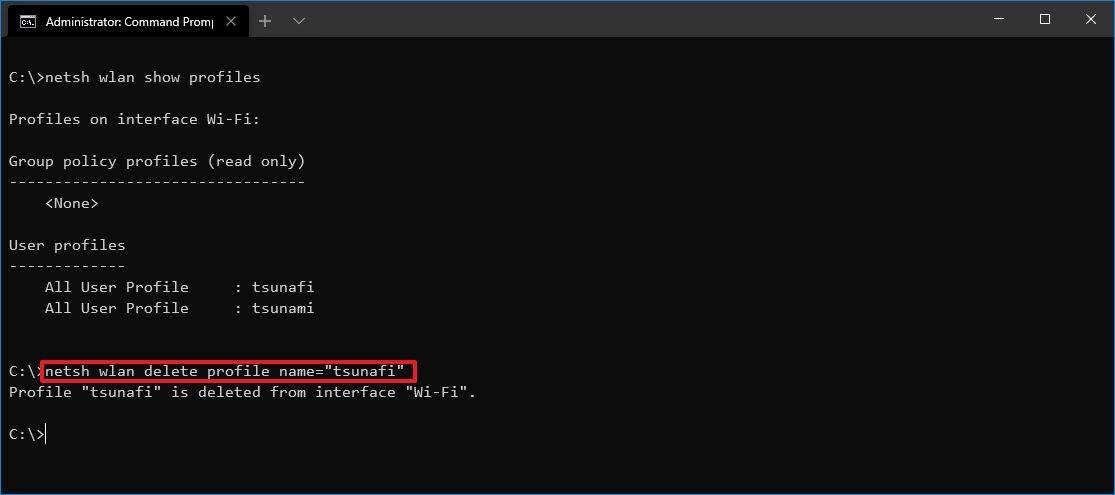
After you complete the steps, the wireless profiled will be deleted from the device. If you need to reconnect, you will need to go through the connection process again, and you will have to provide the network password as necessary.
How to export and import Wi-Fi network profiles on Windows 10
There was an option in Control Panel in previous versions of Windows to export and import wireless network profiles. However, the feature was then removed on Windows 8.1 and Windows 10 in favor of the new feature to sync these settings using a Microsoft account. But it is still possible to export and import the Wi-Fi settings using the netsh command-line tool.
Export wireless settings
To export the wireless settings, use these steps:
- Open Start.
- Search for Command Prompt, right-click the top result, and select the Run as administrator option.
-
Type the following command to export the wireless profiles stored on the device and press Enter:
netsh wlan export profile key=clear folder="FOLDER-PATH"In the command, replace FOLDER-PATH with the path to the export destination folder.
For example, this command export the profiles to the "wireless-backup" folder:
netsh wlan export profile key=clear folder="C:\Users\username\Documents\wireless-backup"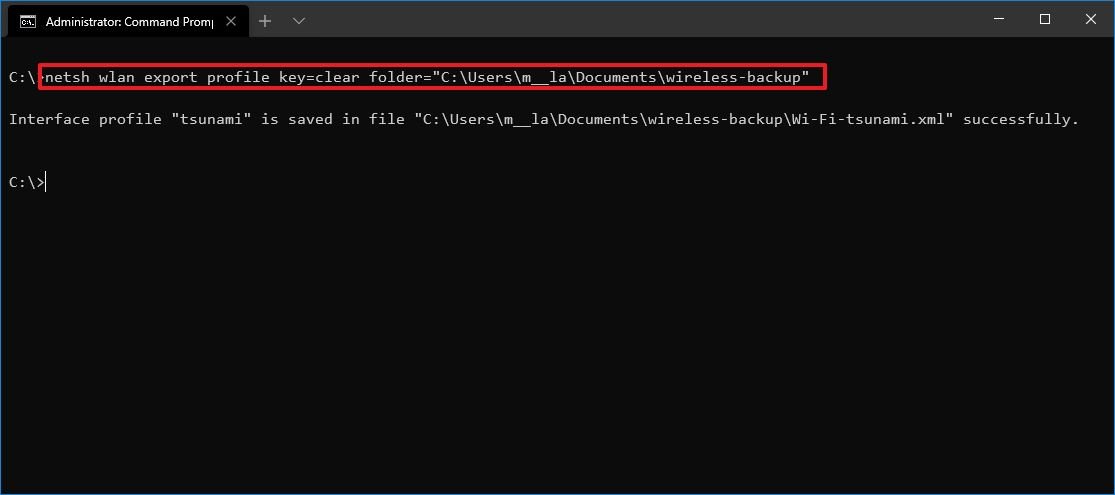
-
(Optional) Type the following command to export a specific profile and press Enter:
netsh wlan export profile name="WLAN-PROFILE-NAME" key=clear folder="FOLDER-PATH"In the command, replace the WLAN-PROFILE-NAME with the profile name you want to export and the FOLDER-PATH with the folder location to export the information.
For example, this command exports the only tsunami profile to the "wireless-backup" folder:
netsh wlan export profile name="tsunami" key=clear folder="C:\Users\username\Documents\wireless-backup"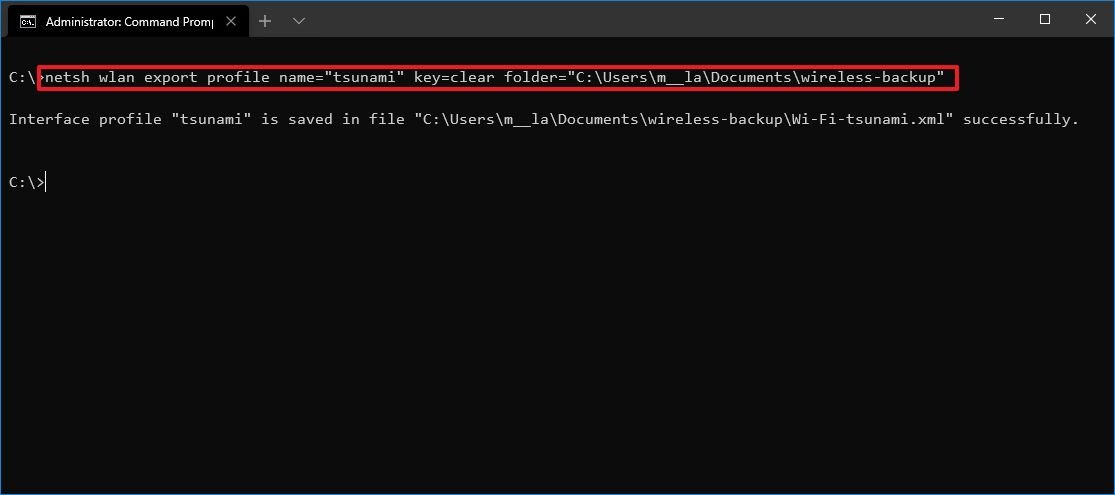
Once you complete the steps, all the profiles will be exported to the location you specified. The output will also show the name and path for each XML file backup.
The export command will create an XML file for each wireless network profile stored on the device. Also, we are using the key=clear option, which will request to store the network security key for each network in the XML file. As a result, make sure to keep these records in a secure place, as they can easily be viewed or edited using any text editor.
Import wireless settings
To import the wireless settings on Windows 10 with command lines, use these steps:
- Open Start.
- Search for Command Prompt, right-click the top result, and select the Run as administrator option.
-
Type the following command to import the wireless profiles and press Enter:
netsh wlan add profile filename="FOLDER-PATH\WLAN-EXPORTED-FILE"In the command, replace FOLDER-PATH\WLAN-EXPORTED-FILE with the path and file name for the exported file.
For example, this command imports a specific profile stored in the "wireless-backup" folder:
netsh wlan add profile filename="C:\Users\username\Documents\wireless-backup\Wi-Fi-tsunami.xml"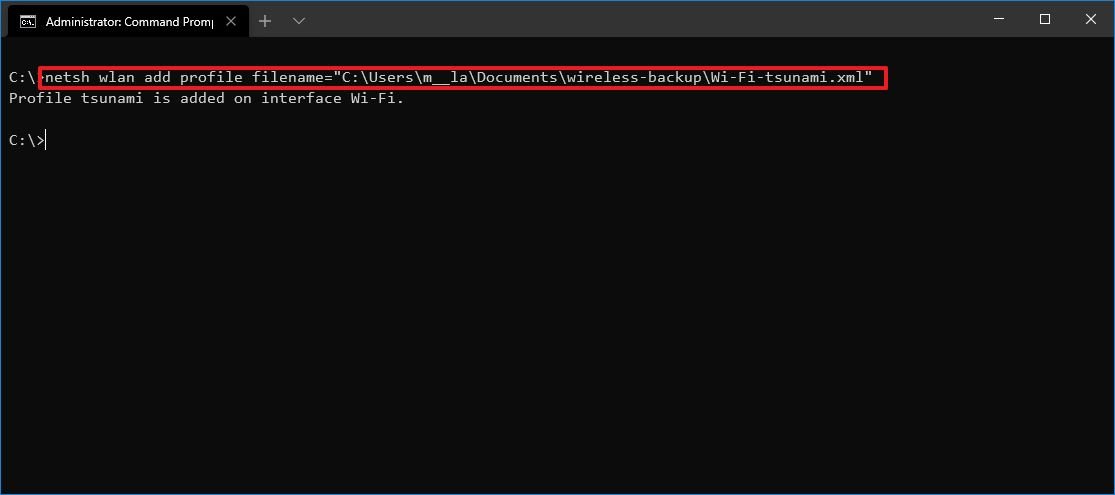
Quick tip: If you have multiple profiles, then repeat the steps and make sure to update the file path and filename of the exported profile.
-
(Optional) Type the following command to import a profile to a particular wireless interface and current user and press Enter:
netsh wlan add profile filename="FOLDER-PATH\WLAN-EXPORTED-FILE" Interface="WLAN-INTERFACE-NAME" user=currentIn the command, make sure to change FOLDER-PATH\WLAN-EXPORTED-FILE for the exported file's path and name containing the profile information and WLAN-INTERFACE-NAME with the name of the interface you want to import the settings.
For example, this command imports the settings to the Wi-Fi interface:
netsh wlan add profile filename="C:\Users\username\Documents\wireless-backup\Wi-Fi-tsunami.xml" Interface="Wi-Fi" user=current
After you complete the steps, the profile will be imported, allowing the device to connect to the wireless network without additional configuration.
How to create Wi-Fi network adapter report on Windows 10
If you need to troubleshoot the wireless connectivity to an access point, netsh also includes a command to create a detailed report with many important details.
To create a wireless report, use these steps:
- Open Start.
- Search for Command Prompt, right-click the top result, and select the Run as administrator option.
-
Type the following command to create a wireless adapter report and press Enter:
netsh wlan show wlanreport
-
Type the following command to open the report and press Enter:
C:\ProgramData\Microsoft\Windows\WlanReport\wlan-report-latest.html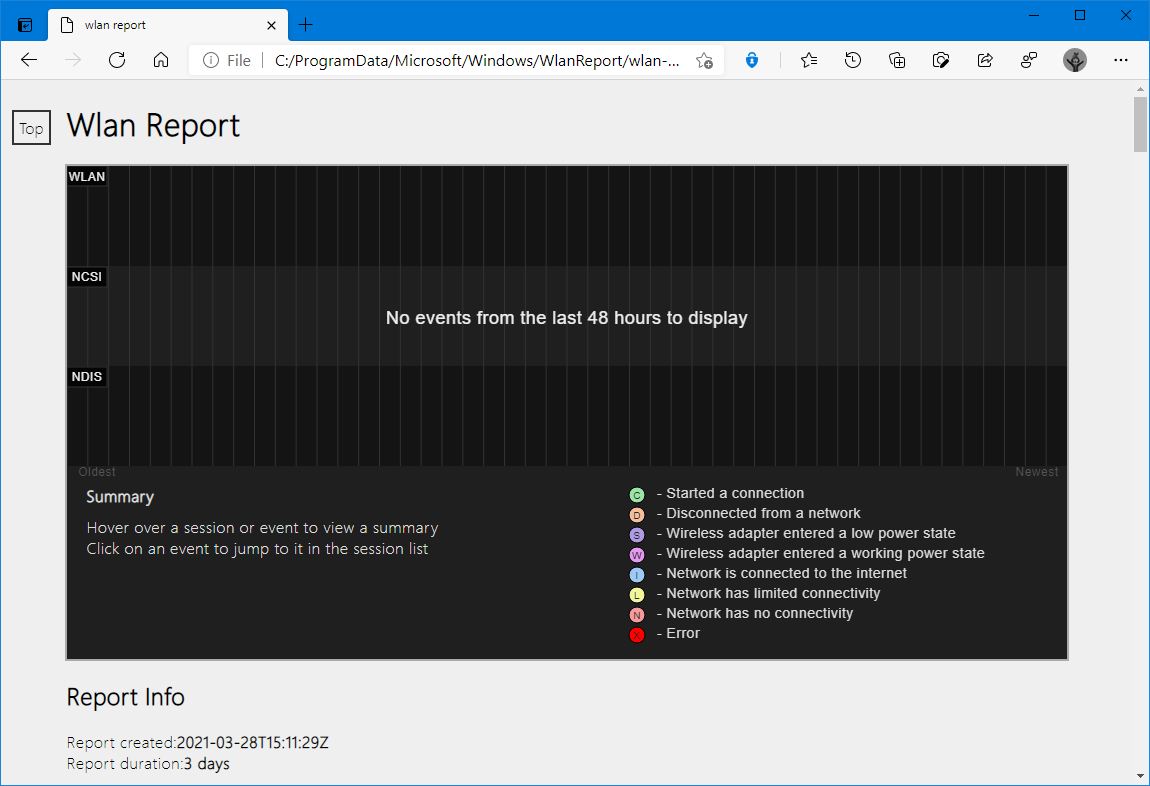
Once you complete the steps, the report will open with the default web browser.
The wlan reports contain a graph with details of the connectivity status, including information, such as when the connection started, when it got disconnected, errors, and more. The report also summarizes the network adapters' information configured on your system, success and failed session, disconnect reasons, and more. It is a very detailed report that can help you ping point many Wi-Fi connectivity issues.
While you can manage many wireless settings through the Settings app, the netsh command-line tool gives you more advanced tools to view, configure, and troubleshoot Wi-Fi and Ethernet connections.
We only focus on the most common commands, but you can always use the netsh wlan command to view all the available options.
More Windows 10 resources
For more helpful articles, coverage, and answers to common questions about Windows 10, visit the following resources:
via https://AiUpNow.com March 30, 2021 at 07:02AM by Mauro Huculak, Khareem Sudlow,
