You can create, modify, and delete scheduled tasks with PowerShell commands, and in this guide, we'll show you how to complete these tasks.
On Windows 10, the Task Scheduler is a useful tool that has been around for many years, and it provides a friendly graphical interface to create automated routines. When you use this tool, you can automate tasks to launch applications, run specific commands, or execute scripts at a specific schedule or when a condition is met.
While the Task Scheduler app offers the most convenient environment to manage tasks on Windows 10, you can also use PowerShell to schedule, modify, and delete tasks, which can come in handy when you need to streamlined the process of creating tasks on several devices or when you need to create a PowerShell script that needs to interact with the console.
In this Windows 10 guide, we will walk you through the basic steps to get started managing scheduled tasks using PowerShell commands.
- How to create scheduled task using PowerShell
- How to change scheduled task using PowerShell
- How to delete scheduled task using PowerShell
How to create a scheduled task using PowerShell
To create a scheduled task with PowerShell on Windows 10, use these steps:
- Open Start.
- Search for PowerShell, right-click the top result, and select the Run as administrator option.
-
Type the following command to create a variable to store the action of the task and press Enter:
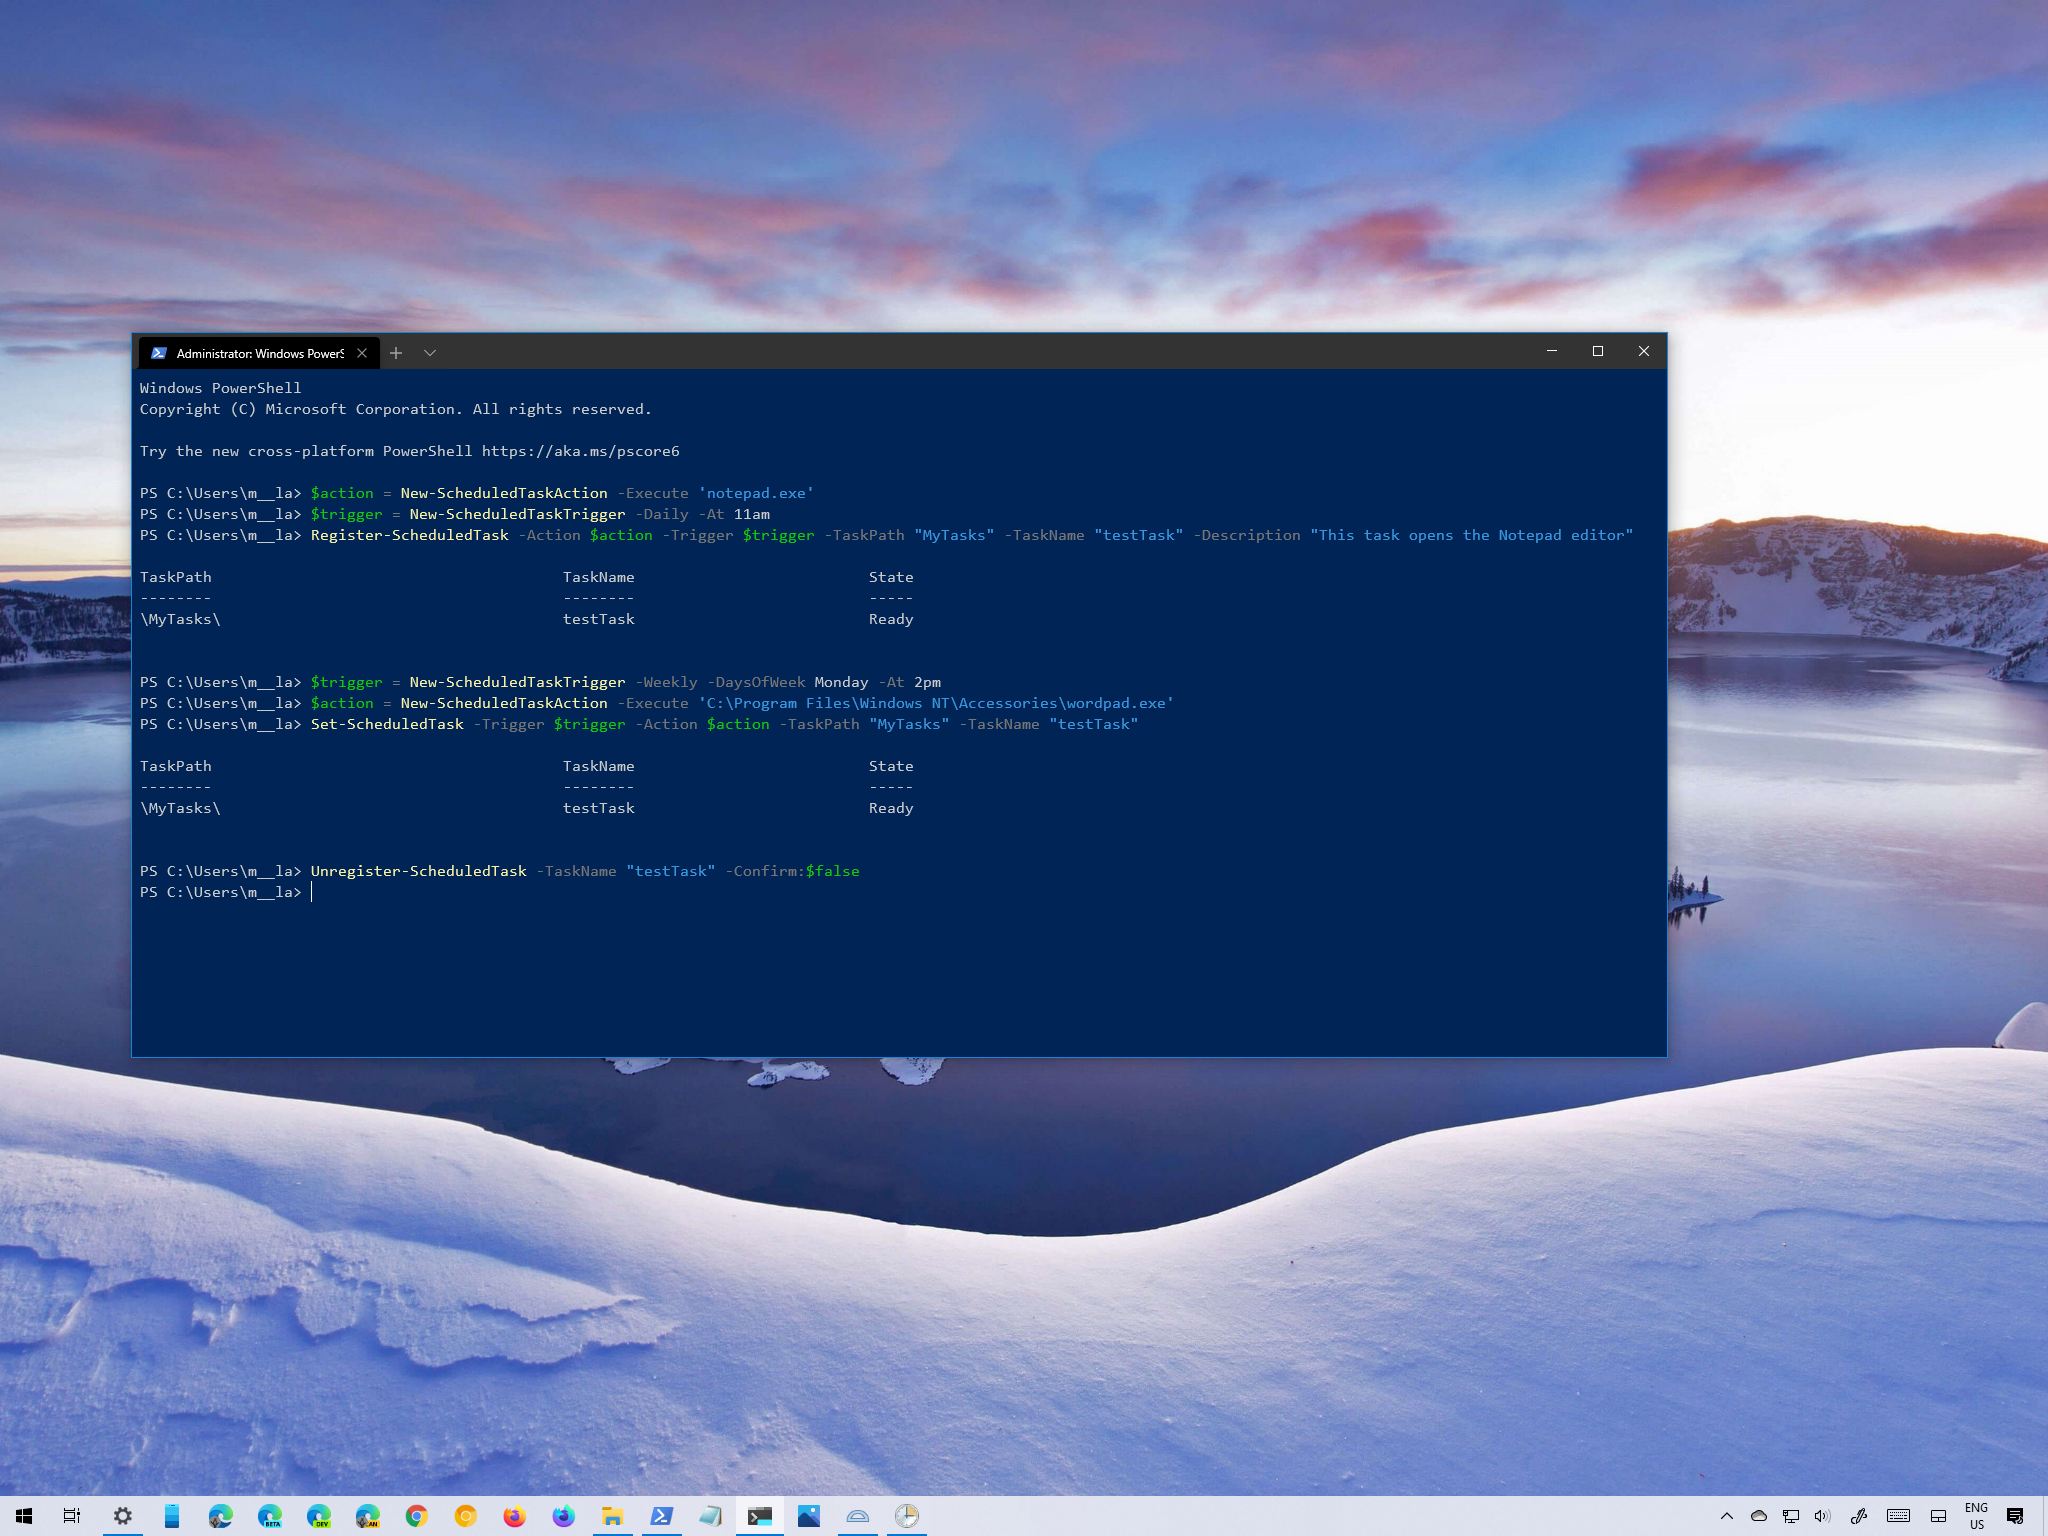
$action = New-ScheduledTaskAction -Execute 'PROGRAM'In the command, make sure to replace 'PROGRAM' with the name of the program you want to start. The "$action" is a variable, and it does not matter the name as long as you keep it short, simple, and descriptive.
For example, this command tells Task Scheduler to start the Notepad app:
$action = New-ScheduledTaskAction -Execute 'notepad.exe'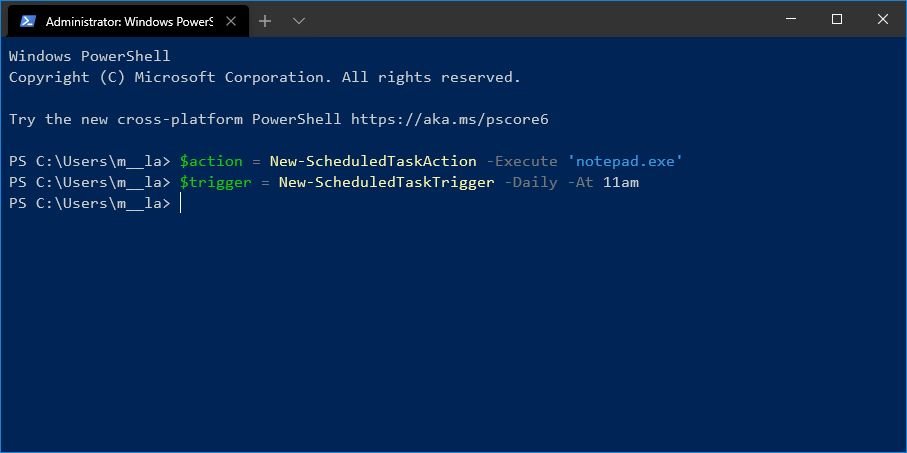
Quick tip: If you are trying to schedule a Command Prompt or PowerShell script, you will use the name of the program for the "-Execute" option and "-Argument" option to specify the path of the script. For example,
$action = New-ScheduledTaskAction -Execute 'cmd.exe' -Argument C:\scripts\myscript.bat -
Type the following command to create a variable that stores the schedule information for the task and press Enter:
$trigger = New-ScheduledTaskTrigger -SETTING -At TIMEIn the command, make sure to replace SETTING and TIME with the details on when you want to run the task. The $trigger is a variable, and it does not matter the name.
For example, this example tells Task Scheduler to run the task daily at 11 am:
$trigger = New-ScheduledTaskTrigger -Daily -At 11amQuick note: For "SETTING," you can use -Once, -Daily, -Weekly, or -Monthly. And for the time, you can use the 12 or 24-hour format. If you are using the "Weekly" option, then you also provide the "-DaysInterval" or "-DaysOfWeek" information followed by the corresponding information. For example, with "-DaysOfWeek," you can use Sunday, Monday, Tuesday, Wednesday, Thursday, Friday, or Saturday (example:
-DaysOfWeek Mondayto run the task every Monday), and "-DaysInterval," you will provide the interval as number (example:-DaysInterval 2to run the task every two days). -
Type the following command to create the scheduled task using the variables you specified on the previous steps and press Enter:
Register-ScheduledTask -Action $action -Trigger $trigger -TaskPath "TASK-FOLDER" -TaskName "TASK-NAME" -Description "OPTIONAL-DESCRIPTION-TEXT"In the command, make sure to update "TASK-NAME" with the task's actual name and "OPTIONAL-DESCRIPTION-TEXT" with the description of the task. The folder "-TaskPath" option is not a requirement, but it will help keep tasks separate. If you do not specify the option with a path, the task will be created inside the Task Scheduler Library folder.
For example, this command creates as a scheduled task with the "testTask" name, custom description, and with settings specified on steps No. 3 and 4:
Register-ScheduledTask -Action $action -Trigger $trigger -TaskPath "MyTasks" -TaskName "testTask" -Description "This task opens the Notepad editor"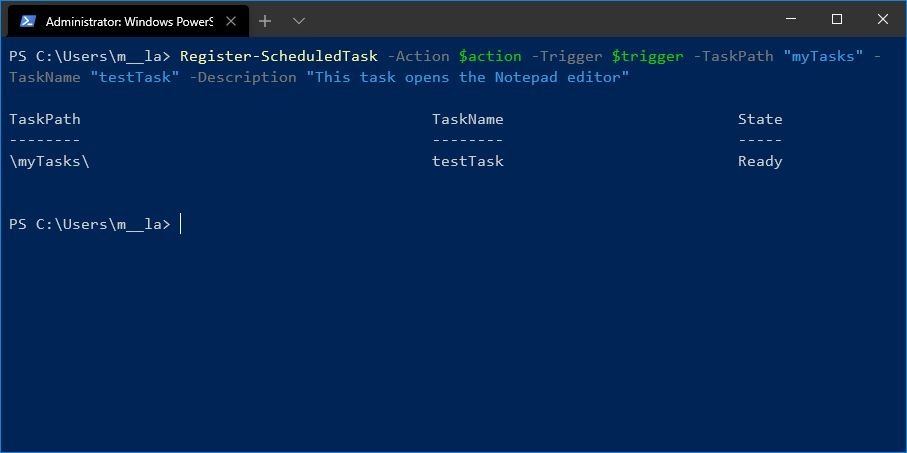
Once you complete the steps, the task will be created and scheduled according to your configuration.
How to change scheduled task using PowerShell
To modify an already scheduled task with PowerShell commands, use these steps:
- Open Start.
- Search for PowerShell, right-click the top result, and select the Run as administrator option.
-
Type the following command to create a variable to store the schedule changes and press Enter:
$trigger = New-ScheduledTaskTrigger -SETTING -At TIMEIn the command, make sure to replace SETTING and TIME with the new the updated information on when to run the task.
For example, this command updates the task with a new trigger schedule:
$trigger = New-ScheduledTaskTrigger -Weekly -DaysOfWeek Monday -At 2pm -
(Optional) Type the following command to create a variable to store the new action changes and press Enter:
$action = New-ScheduledTaskAction -Execute 'PROGRAMIn the command, make sure to replace 'PROGRAM' with the name of the new program you want to start.
For example, this command tells the Task Scheduler to change the start program to WordPad:
$action = New-ScheduledTaskAction -Execute 'C:\Program Files\Windows NT\Accessories\wordpad.exe'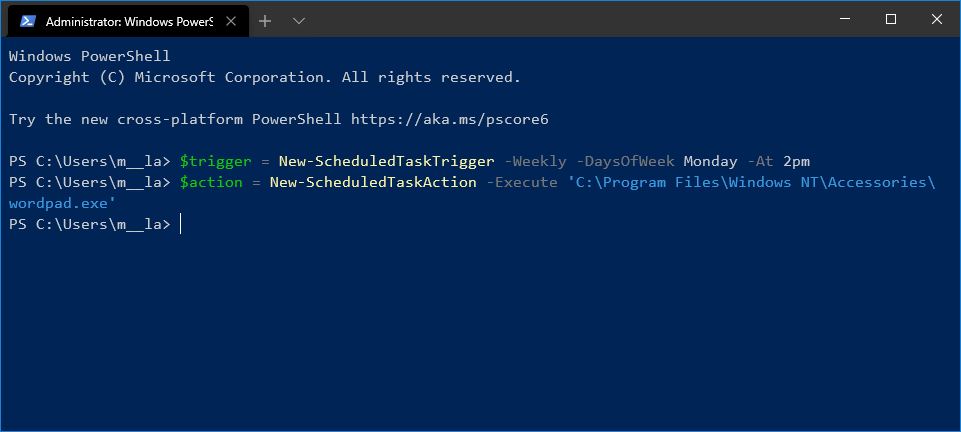
-
Type the following command to change the settings of the scheduled task and press Enter:
Set-ScheduledTask -Trigger $trigger -Action $action -TaskPath "TASK-FOLDER" -TaskName "TASK-NAME"In the command, replace TASK-NAME with the name of the task you want to update. If you are storing the task in a specific folder, make sure to update TASK-FOLDER with the name of the folder storing the task. Otherwise, remove the -TaskPath "TASK-FOLDER" option from the command.
For example, this command updates the testTask task with the new action and trigger settings:
Set-ScheduledTask -Trigger $trigger -Action $action -TaskPath "MyTasks" -TaskName "testTask"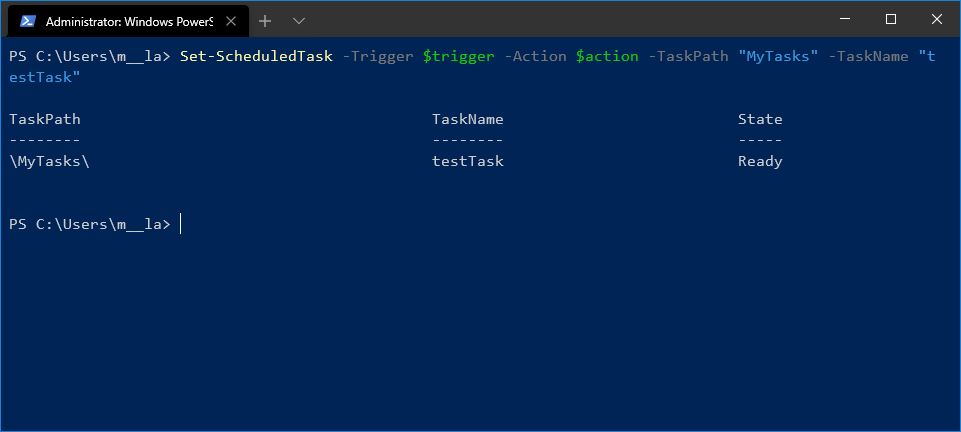
The above example shows the steps to update the "triggers" and "actions" settings, but you can also update only one, three, or more settings. You only need to create the variable and then apply it with the Set-ScheduledTask command. For example, using the above steps as a reference, you could skip step No. 4, and then use this command to only update the schedule: Set-ScheduledTask -Trigger $trigger -TaskName "testTask".
How to delete scheduled task using PowerShell
To delete a scheduled task from the Task Scheduler with PowerShell, use these steps:
- Open Start.
- Search for PowerShell, right-click the top result, and select the Run as administrator option.
-
(Optional) Type the following command to confirm the task exists and press Enter:
Get-ScheduledTask -TaskName "TAKS-NAME"In the command, make sure to replace "TAKS-NAME" with the name of the task.
For example, this command shows the testTask task:
Get-ScheduledTask -TaskName "testTask" -
Type the following command to delete the scheduled task and press Enter:
Unregister-ScheduledTask -TaskName "TASK-NAME" -Confirm:$falseIn the command, make sure to replace "TAKS-NAME" with the name of the task. The "-Confirm:$false" option deletes the task without asking for confirmation.
For example, this command deletes the testTask task:
Unregister-ScheduledTask -TaskName "testTask" -Confirm:$false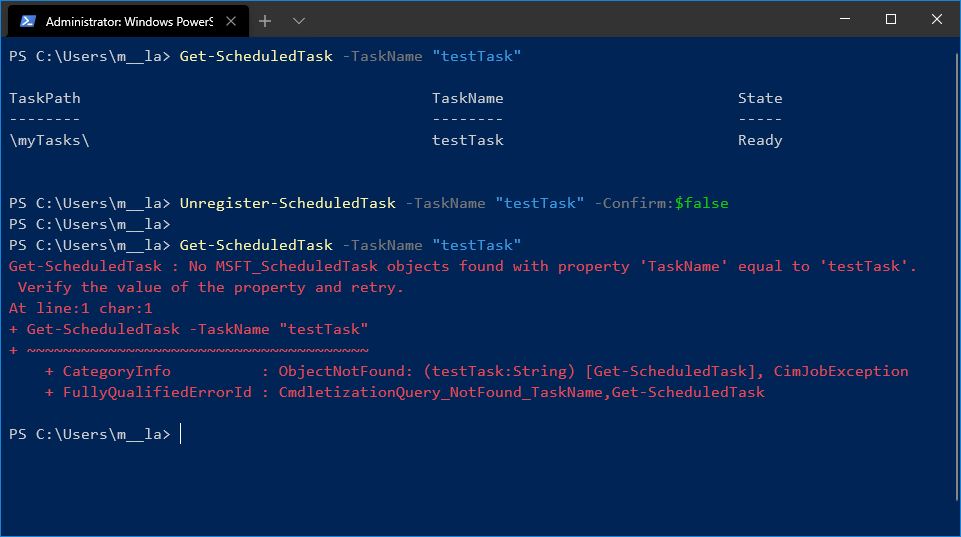
-
(Optional) Type the following command to confirm the task has been deleted and press Enter:
Get-ScheduledTask -TaskName "TAKS-NAME"In the command, make sure to replace "TAKS-NAME" with the name of the task.
For example, this command to confirm the testTask task is no longer available:
Get-ScheduledTask -TaskName "testTask"
Once you complete the steps, if you receive an error indicating no task with that specific name, it means that the task has been deleted.
This guide focuses on the basic steps to start managing scheduled tasks using PowerShell. However, using PowerShell commands, you can manage many other settings. You can start and stop tasks, view task information, and much more using the many available modules.
In addition to using PowerShell, you can also create, modify, and remove tasks using Command Prompt.
More Windows 10 resources
For more helpful articles, coverage, and answers to common questions about Windows 10, visit the following resources:
via https://AiUpNow.com January 30, 2021 at 02:01PM by Mauro Huculak, Khareem Sudlow,
